Setup for my Fessender S10

Instruments, mechanical issues, copedents, techniques, etc.

Moderator: Shoshanah Marohn

Post Reply
Phillip Hermans
Posts: 57
Joined: 1 Nov 2017 10:03 pm
Location: Berkeley, California, USA
Contact:

Setup for my Fessender S10

Post by Phillip Hermans »

I just purchased my first pedal steel a Fessender S10, via a forum member.

Image

I am already having a great time playing this thing! I guess a decade of playing lap steel made the transition not too bad. A lot more doo-hickeys, wingnuts and dingbats to fiddle with, but it sure sounds great, especially with a sweetened tuning!


edit: the B was pedal sticking is due to this washer blocking the gizmo that the pedal rod connects to
Image
I think this was a modification (repair?) done by the previous owner. I removed the washer hopefully nothing explodes.


Here is the copedant it came with:

Image
I believe he tuned the 9th string to C#... for now I am tuning that string to D. Which in combination with B pedal + LKR lets me get a V7. nifty 8)

I might eventually change the LKR to something like the "D" on b0b's site https://b0b.com/wp/copedents/e9th/
Not sure I am ready to tackle all that tinkering yet, for now I got plenty to learn just playing it as is!
User avatar
Jon Light
Posts: 13745
Joined: 4 Aug 1998 11:00 pm
Location: Saugerties, NY
Contact:

Post by Jon Light »

Couple of things --

Before you edited this, I watched your video and was planning on coming back to it this morning with some tips. But you've taken it down.

I saw pretty excessive play in that cross shaft.
Play in the Fessenden cross shafts is a seasonal thing (body expansion/contraction) and is a known necessary adjustment. I has come up a good number of times on the forum.
I've got opinions on this subject but they are irrelevant.

The adjustment requires removing the metal strip on the back apron (i never found a way that wasn't awkward) and pushing the embedded bushings into the body with a hammer and, ideally, I found, a socket wrench socket of exactly the right size (OD small enough to fit inside the hole in the wood, ID large enough to surround the shaft). When you need to provide more slack (binding is even more problematic than excess movement) you need to force the bushing back out.

I can provide more details & photos if requested (last time I spent time with photos and procedures, a few days ago, I discovered that the OP really wasn't interested.....waste of my time).
User avatar
Jon Light
Posts: 13745
Joined: 4 Aug 1998 11:00 pm
Location: Saugerties, NY
Contact:

Post by Jon Light »

btw -- b0b's D lever lowering string 9 from D >> C# is very common and is very useful. I don't want to complicate matters (because it does get complicated) but there is a fairly standard way to achieve the feeler-tuning of the second string D# >> D/C# that involves the 9th string lower. You would ideally have some expert help in making this happen if you were interested.
User avatar
Earnest Bovine
Posts: 8318
Joined: 4 Aug 1998 11:00 pm
Location: Los Angeles CA USA

Post by Earnest Bovine »

Just above your red circle, it looks like the hook on the pedal rod isn't going thru the hole as it should. The pedal rods on A and C pedals look OK.

Image
Phillip Hermans
Posts: 57
Joined: 1 Nov 2017 10:03 pm
Location: Berkeley, California, USA
Contact:

Post by Phillip Hermans »

Jon Light wrote:Couple of things --

Before you edited this, I watched your video and was planning on coming back to it this morning with some tips. But you've taken it down.

I saw pretty excessive play in that cross shaft.
Play in the Fessenden cross shafts is a seasonal thing (body expansion/contraction) and is a known necessary adjustment. I has come up a good number of times on the forum.
I've got opinions on this subject but they are irrelevant.

The adjustment requires removing the metal strip on the back apron (i never found a way that wasn't awkward) and pushing the embedded bushings into the body with a hammer and, ideally, I found, a socket wrench socket of exactly the right size (OD small enough to fit inside the hole in the wood, ID large enough to surround the shaft). When you need to provide more slack (binding is even more problematic than excess movement) you need to force the bushing back out.

I can provide more details & photos if requested (last time I spent time with photos and procedures, a few days ago, I discovered that the OP really wasn't interested.....waste of my time).
Apologies for pulling the rug out from under you. For those that want more context, here is the video I originally posted:
https://drive.google.com/file/d/1OGQpNb ... sp=sharing

I would be interested to hear your opinions on this. I have read some other threads on the topic, as I was scrubbing the forum for insights.

This thread seems relevant: https://bb.steelguitarforum.com/viewtopic.php?t=150858

I would also be interested to see those photos and instructions you put together, lets not waste that knowledge!
Jon Light wrote:btw -- b0b's D lever lowering string 9 from D >> C# is very common and is very useful. I don't want to complicate matters (because it does get complicated) but there is a fairly standard way to achieve the feeler-tuning of the second string D# >> D/C# that involves the 9th string lower. You would ideally have some expert help in making this happen if you were interested.
I am also interested in how to do this.
I will give a caveat, that at this point, I am really more eager to play the thing than tinker with it. But as I acquire all the needed tools and become more familiar with the mechanisms I will be sure to apply this knowledge. Some day I may even try to add some more pedals to this thing (it looks like there are holes drilled for more pedals in the undercarriage, but that can be a discussion for another day)
Earnest Bovine wrote: Just above your red circle, it looks like the hook on the pedal rod isn't going thru the hole as it should.
Whoops! Good catch, oddly, it doesn't seem to impact the action to much, but I will correct it.
User avatar
Jon Light
Posts: 13745
Joined: 4 Aug 1998 11:00 pm
Location: Saugerties, NY
Contact:

Post by Jon Light »

I am also interested in how to do this.
I will give a caveat, that at this point, I am really more eager to play the thing than tinker with it. But as I acquire all the needed tools and become more familiar with the mechanisms I will be sure to apply this knowledge. Some day I may even try to add some more pedals to this thing (it looks like there are holes drilled for more pedals in the undercarriage, but that can be a discussion for another day)
Good! Absolutely, if it can wait until some other time, I couldn't agree more with playing it rather than messing with it!
btw, it is not at all uncommon to see holes where someone might have moved a knee lever over an inch, for instance.

This shows the removed cover strip. I had to pry & bend that strip to get it out & off.
The right size socket laid against the bushing can be tapped with a hammer. Carefully and slowly take up the excess space but be sure to leave a certain amount of sideways wiggle room.
Another issue is that with contraction, the cross shaft ends (on my guitar) protruded a lot (not shown) and the strip could not sit flush.

Image


When the seasons change and you have to go the other way, a screwdriver can pry the whole thing back out.
If it is a knee lever with no flange, I couldn't find any way other than to grab the shaft with a vice-grip and dig a long-shaft screwdriver into the underside wood and lever the whole thing outward.
Image
John Hyland
Posts: 289
Joined: 6 Sep 2021 10:45 pm
Location: South Australia

Post by John Hyland »

That’s serious maintenance!!! Sounds like the body needs some sort of cross brace to minimise the “seasonal “ changes.
Or maybe a collar on the cross shaft which takes up the slack.
John Hyland
Posts: 289
Joined: 6 Sep 2021 10:45 pm
Location: South Australia

Post by John Hyland »

That’s serious maintenance!!! Sounds like the body needs some sort of cross brace to minimise the “seasonal “ changes.
Phillip Hermans
Posts: 57
Joined: 1 Nov 2017 10:03 pm
Location: Berkeley, California, USA
Contact:

Post by Phillip Hermans »

John Hyland wrote:That’s serious maintenance!!! Sounds like the body needs some sort of cross brace to minimise the “seasonal “ changes.
Well, in light of that, what do you think a reasonable price for this guitar would be?
User avatar
Jerry Jones
Posts: 841
Joined: 6 Sep 2007 4:26 pm
Location: Franklin, Tenn.

Post by Jerry Jones »

It looks like some of the down-line bell cranks might be forcing the B pedal rods and the B pedal shaft away from the pedal stop.
Jerry Jones
Phillip Hermans
Posts: 57
Joined: 1 Nov 2017 10:03 pm
Location: Berkeley, California, USA
Contact:

Post by Phillip Hermans »

John Hyland wrote:That’s serious maintenance!!! Sounds like the body needs some sort of cross brace to minimise the “seasonal “ changes.
I wondered about something like that, since right now I have too much play... what if I wedged a piece of foam or something else in there, so it absorbed some of the wiggling... I guess it doesn't hurt to try.
Jerry Jones wrote: It looks like some of the down-line bell cranks might be forcing the B pedal rods and the B pedal shaft away from the pedal stop.
It does seem to be a bit of a traffic jam down there. I assume that will always happen to some extent, but I do have to wonder if there is a more efficient setup. I suppose I need to look under the hood of more guitars to see how they do it. Or maybe I will find someone in the area experienced who can go through it with me.
John Light wrote:This shows the removed cover strip. I had to pry & bend that strip to get it out & off.
Yikes! This is the part that frightens me. Did you manage to bend it without putting a kink in it? Does it go back on flush?
Also, I'm not familiar with all the appropriate terms for the anatomy, but I assume the "back apron" is the side of the guitar that faces the player? I see 4 screws on what I assume is the cover strip, and the ends are tucked under the metal pieces at the head and bridge of the guitar. I see what you mean how you would need to wiggle / pry / bend it out of there. I don't always have the most finesse with mechanical parts, but with enough patience I think I could do it.
User avatar
Jon Light
Posts: 13745
Joined: 4 Aug 1998 11:00 pm
Location: Saugerties, NY
Contact:

Post by Jon Light »

Yes, you are correct -- front apron faces the audience.
The strip itself is resilient and can take a fair amount of flexing. But I never could find a way to grip it, after removing the screws, other than to insert something into the screwhole and try to get a grip to pry the thing out. Elegant? Nope. Basically the guitar has an important adjustment that periodically needs to be made (per the builder's instructions) but how to get at the vital area is....not user friendly.
Phillip Hermans
Posts: 57
Joined: 1 Nov 2017 10:03 pm
Location: Berkeley, California, USA
Contact:

Bushings Fixed! Time to get more complicated! ;-)

Post by Phillip Hermans »

Jon Light wrote:Yes, you are correct -- front apron faces the audience.
The strip itself is resilient and can take a fair amount of flexing. But I never could find a way to grip it, after removing the screws, other than to insert something into the screwhole and try to get a grip to pry the thing out. Elegant? Nope. Basically the guitar has an important adjustment that periodically needs to be made (per the builder's instructions) but how to get at the vital area is....not user friendly.
Jon, thanks for the detailed explanation and walking me through this. It gave me the confidence to try, and it turned out to be a very simple task! The back apron has holes drilled regularly along it (I suppose for more levers/pedals to be attached?) So after I unscrewed the chrome plate, I could just poke from the inside of the guitar through an empty hole and push the plate off. It was beveled on the headstock side of the guitar and slid out of that slot. Except for a small amount of adhesive (or something?) on the other end It came off smoothly!

I tapped the bushings back in a bit and instantly the guitar seems to play a lot smoother! Much less creaking and clicking. :D

So with the confidence of that successful fix, I now want to prepare for a bigger undertaking: changing my copedant.

Image

Here we see the way the guitar came setup, and the "standard" E9 copedant from b0b's site.
At the very least, I think I would like to have the E lower and raise on the left side. So that is, swap LKR for RKL. It seems like a waste to have them on opposite legs, I can't think of a reason I would ever engage both of them at the same time, so why not have them on the same leg??

Is that possible with the existing parts? I assume I already have the correct length rods for the levers its just a matter of hooking them up to the right strings on the changer?

In preperation I am going to photograph everything. Then go through and label each component with tape. I'll document a plan for how I want to hook them up, and then go slowly... then I guess I need to learn how to tune properly!

I'm collecting threads of people that worked on Fessy's and gave their advice. I'd welcome anymore input y'all might have! So far this is way more accesible than working on a stratocaster or (god-forbid) a semi-hollow body :? 
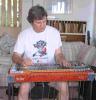
... everything is just hangin out under the hood, ready to be fiddled with!

It looks pretty straightforward to me, but I'm sure I'll be cussin before its all through.
User avatar
Richard Sinkler
Posts: 17067
Joined: 15 Aug 1998 12:01 am
Location: aka: Rusty Strings -- Missoula, Montana

Post by Richard Sinkler »

One of the arguments for having E raises and lowers on separate knees is, when you are in the A pedal and E to F lever (F lever) position (3 frets up from no pedals position - ex. E chord at fret 3) is to have the ability to be able to lower the E strings from F to D# without the delay or bump you will get if on the same knee. That is the same movement as releasing the A oedal in the A&B pedals position (common term is "pedals down" position). Paul Franklin promotes that setup. Buddy Emmons promoted E raises and lowers on the same knee. A long time ago, there was a thread on that subject where Buddy and Paul discussed their view on having them on the same knee vs different knees. Neither is wrong in my opinion.
Last edited by Richard Sinkler on 18 Oct 2023 3:41 am, edited 1 time in total.
Carter D10 8p/8k, Dekley S10 3p/4k C6 setup,Regal RD40 Dobro, NV400, NV112 . Playing for 53 years and still counting.
User avatar
Richard Sinkler
Posts: 17067
Joined: 15 Aug 1998 12:01 am
Location: aka: Rusty Strings -- Missoula, Montana

Post by Richard Sinkler »

I have repaired and changed the setup on 2 Fessenden guitars. They are easy to work on. You should have the parts in the guitar that you will need since all pedals and levers have 2 string pulls already (except the vertical). You just need to move the bell cranks (some call them rod pullers ir pull bars) in line with the string you want to affect. You MIGHT have to adjust the lever travels or put the rod in a different hole in the bellcrank and/or changer if the string won't lower or raise all the way.

One thing you might consider is seeing if you can find another bellcrank and rod for RKL to raise string 1 to G#. It is very useful when used with the 2nd string raise to E. I don't find many uses for the 2nd string raise to E by itself, but I haven't really explored that change that much.
I believe he tuned the 9th string to C#... for now I am tuning that string to D. Which in combination with B pedal + LKR lets me get a V7. nifty Cool
That V7 chord is easier and most commonly achieved with the B pedal and E to D# lower knee lever. I don't think I have ever seen or heard any other player talk about it the way you explained. It's much more useful to have the 9th string at D (I and many others use it a lot) and lower it to C#. I don't see any advantage to raising it to D# unless you have an extra lever, which would better put to use with other changes. He may have tuned it to C# in case his picking got sloppy and he hit that D by mistake making a tense sound as opposed to the soothing 6th type sound of the C# note. Some players also do that on string 2 in case they hit it by mistake. They will tune it to C# and raise it to D and D# on the lever.
Last edited by Richard Sinkler on 18 Oct 2023 3:49 am, edited 1 time in total.
Carter D10 8p/8k, Dekley S10 3p/4k C6 setup,Regal RD40 Dobro, NV400, NV112 . Playing for 53 years and still counting.
User avatar
Jon Light
Posts: 13745
Joined: 4 Aug 1998 11:00 pm
Location: Saugerties, NY
Contact:

Post by Jon Light »

Nothing new -- just doubling down on a couple of points.

-- Yes, there is no right or wrong re: E raises & lowers on same vs. split knees. I believe that more people go with the same knee. I split them. You can find specific (dis)advantages to each. If I'm not mistaken, standard tuning, as they left the factory, had split knees on Sho-Bud guitars, same knee on Emmons. So some people call them Sho-Bud and Emmons setups, just to confuse matters more (since we already have Emmons/Day setups on the pedals).

-- I consider raising the 1st string to be far more useful than raising the 2nd, by a large factor, if you are going to only pull one. Unfortunately it creates another subjedt which is 'raise it to G or raise it to G#? IMO G# is very very cool for licks. But G gives you a killer Dom7 with pedals down -- the Mooney thing. I've never had a feeler stop there and I have no opinion on that.

-- As a 12 string Universal player I do not have 9th string D. But with all the 10 string E9 guitars I have worked on in my shop I have come to appreciate the D > C# lower. Aside from using it to create the feeler stop on the 2nd string, it is a lovely way to use the 9th string as a root or low voicing in a chord and be able to resolve the chord with A&B pedals and the D>C# lower. It has earned its way into its status as an E9 standard (as much as any PSG setup can be called 'standard').
User avatar
Richard Sinkler
Posts: 17067
Joined: 15 Aug 1998 12:01 am
Location: aka: Rusty Strings -- Missoula, Montana

Post by Richard Sinkler »

-- I consider raising the 1st string to be far more useful than raising the 2nd, by a large factor, if you are going to only pull one. Unfortunately it creates another subjedt which is 'raise it to G or raise it to G#? IMO G# is very very cool for licks. But G gives you a killer Dom7 with pedals down -- the Mooney thing. I've never had a feeler stop there and I have no opinion on that.
Me too. I have both the F# to G on my vertical lever (both F# strings) and the first string to G# on my RKR (along with string 2 to E and 6 to F#). I would say I use F# to G more.
Carter D10 8p/8k, Dekley S10 3p/4k C6 setup,Regal RD40 Dobro, NV400, NV112 . Playing for 53 years and still counting.
Phillip Hermans
Posts: 57
Joined: 1 Nov 2017 10:03 pm
Location: Berkeley, California, USA
Contact:

Post by Phillip Hermans »

Thanks again fellas.

Based on all that info y'all shared, I opted to just changed my LKR to lower the 9th string a half-step. I left everything else alone for now.

This is turning out to be a lot easier than I initially thought! I just unscrewed the nylon, moved the rod from upper changer hole to lower, put the nylon back on and tuned it up... honestly it seems too easy! I thought these things were complicated! :lol:


OK, I have one final question before I consider my guitar "set up"

The previous owner had wedged a small piece of foam cushion between all of the rods... ostensibly to reduce noise / friction. Anyone use a hack like this? I would imagine there is a better way to deal with a traffic jam of rods and bellcranks bumping into eachother? Is the answer just a regular application of trilube?

Regardless, I feel like I get how this puppy operates and am good to do my own general work. But that's why I got the Fessy... I had an option to buy a Sho-Bud but had heard too many 'caveat emptor's about maintenance.
User avatar
Jon Light
Posts: 13745
Joined: 4 Aug 1998 11:00 pm
Location: Saugerties, NY
Contact:

Post by Jon Light »

Use of foam is not uncommon. It is about noise/rattle reduction. Poor rod routing can sometimes create friction -- usually if a rod rubs against a bellcrank enroute to the changer -- but rod against rod contact is really a noise, not a friction issue. The remedy for friction situations can be to loosen and move a bellcrank a hair or sometimes even to route the rod right thru the bellcrank.
There are very few scenarios that would call for lubrication and oil should always be used very sparingly.
Note that rod positioning can be different with the guitar right side up vs. upside down. So diagnosing rod rub or clatter requires some observation of gravity's interaction with the undercarriage.
Bobby D. Jones
Posts: 2235
Joined: 17 May 2010 9:27 am
Location: West Virginia, USA

Post by Bobby D. Jones »

Some guitars come from the factory with a piece of foam in the pull rods to cut down rattle in the pull rods.
I have taken it out of 2 guitars.

Gravity will change the position of the rods when turned over to actually work on.

If you remove the foam, Pull the foam, set the guitar up on its legs and move the pedals and levers and find the rods and bell cranks that rattle. Mark the ones you want to move and where to place the bell cranks on the cross rods. Then turn the guitar over and move the rods and bell cranks to cut rattle.
Is this picture something near to the foam that is in the pull rods on your guitar?
Image
This is a piece of foam that came from the factory in the pull rods.
Phillip Hermans
Posts: 57
Joined: 1 Nov 2017 10:03 pm
Location: Berkeley, California, USA
Contact:

Post by Phillip Hermans »

Bobby D. Jones wrote:Some guitars come from the factory with a piece of foam in the pull rods to cut down rattle in the pull rods.
I have taken it out of 2 guitars.

Gravity will change the position of the rods when turned over to actually work on.

If you remove the foam, Pull the foam, set the guitar up on its legs and move the pedals and levers and find the rods and bell cranks that rattle. Mark the ones you want to move and where to place the bell cranks on the cross rods. Then turn the guitar over and move the rods and bell cranks to cut rattle.
Is this picture something near to the foam that is in the pull rods on your guitar?
Image
This is a piece of foam that came from the factory in the pull rods.
Hey Bobby, as you'll see in the picture, this is just a small piece of foam that the previous owner added, I don't think this is from the factory.

Image


As far as flip the guitar over to work on it... I don't really have a good bench. I just get under there like I'm changing the oil and do everything laying on the floor... very relaxing... :o so far so good!
Post Reply