Photos of Bakelite Neck Repair
Moderator: Brad Bechtel
-
- Posts: 14
- Joined: 27 Apr 2005 12:01 am
- Location: Brookston, Indiana, USA
- Contact:
Photos of Bakelite Neck Repair
I repaired broken neck the early forties Bakelite Rickenbacher using the Wayne Tanner method suggested to me by Roy Montee. I ordered the Brownell's AcraGlas at a local gun shop and while waiting for it to arrive, I built a clamping gizmo out of 3/4 inch plywood.
The neck pieces fit together perfectly, but when I laid them on the plywood there was a slight gap at the fretboard side, careful examination showed that the neck was slightly bowed. If I didn't know better, I would say that it was neck relief, the slight bowing in a regular guitar neck to compensate for the fact that the greatest amplitude of vibration of a string is at it's center. I suppose the bowing is caused by "creep," deformation caused by 60 years of string tension.
I discovered that if I held the peg head and pushed on the tail end of the neck, the pieces would line up perfectly. I built the gizmo with a loose piece at the tail end and two half-inch threaded rods with wing nuts to apply pressure.
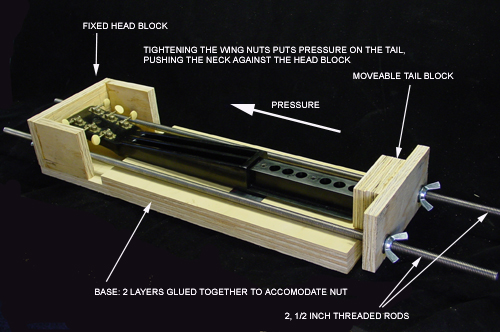
This worked fine except that the neck wasn't perfectly straight. I added two strips of wood on either side of the neck. the neck is a perfect taper from tail end of the fretboard to the nut, so pressure from the wing nuts would actually force it into alighnment. I also added to more strips of wood to keep the threaded rod in alignment. I made a groove underneath the joint and lined it with aluminum tape, so that any drips wouldn't glue the neck to the gizmo.
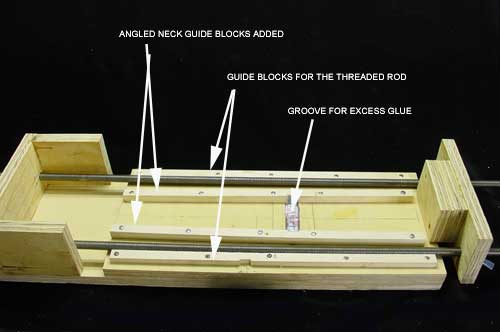
This worked fine so I mixed up the epoxy, which is mixed 4 to 1 epoxy to hardener. I have two matching sets of stainless steel measuring spoons, so I used one 1/4-teaspoon to scoop out 4 spoonfuls of epoxy resin and the other to measure out one 1/4-teaspoon of hardener. I poured them into a stainless steel measuring cup and stirred for 2 minutes. I then put in 2 drops of black colorant and contued stirring for 2 more minutes. I brushed it on both pieces with a throwaway brush, stuck them together and put the neck into the gizmo, and snugged up the wing nuts. I then turned the wing nuts until it was solid and hard to turn, but I didn't overdo it.
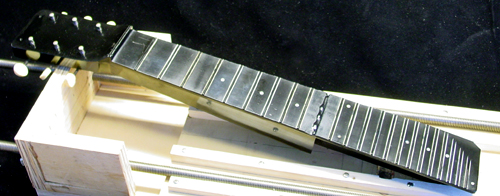
The instructions say that the epoxy reaches full strength after 2-1/2 days, so I left it in for 3 days.
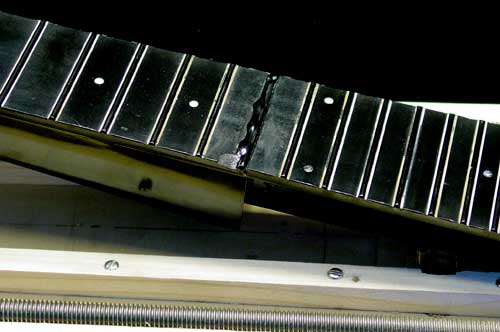
I'll be able to sand down the excess to match the other frets. There is plenty of resin left to fill the low spots where chips popped out.
I strung it up this evening, it sounds wonderful!
Howie Clark<font size="1" color="#8e236b<font size="1" color="#8e236b<font size="1" color="#8e236b"><p align="center">[This message was edited by Howard Clark on 01 June 2005 at 11:57 PM.]</p></FONT>
-
- Posts: 153
- Joined: 13 Dec 2004 1:01 am
- Location: Smithsburg, Maryland, USA
- Terry Farmer
- Posts: 530
- Joined: 28 Jun 2002 12:01 am
- Location: Albuquerque, New Mexico, USA
-
- Posts: 1632
- Joined: 4 May 2003 12:01 am
- Location: Oahu, Hawaii USA
- Contact:
- Gerald Ross
- Posts: 3205
- Joined: 4 Aug 1998 11:00 pm
- Location: Ann Arbor, Michigan, USA
- Contact:
Howie,
Incredible!! Beautiful work. Well thought out, not rushed and thorough.
You, Wayne Tanner, Bill Creller and Rick Aiello have done a great deal and added to the knowledge base that keeps these old instruments alive and well. Thank you.
See you at the Winchester Aloha convention next month?
------------------
Gerald Ross
'Northwest Ann Arbor, Michigan's King Of The Hawaiian Steel Guitar'
Gerald's Fingerstyle Guitar Website
Board of Directors Hawaiian Steel Guitar Association
<font size="1" color="#8e236b"><p align="center">[This message was edited by Gerald Ross on 02 June 2005 at 07:53 AM.]</p></FONT>
-
- Posts: 66
- Joined: 15 Apr 2005 12:01 am
- Location: Arizona, USA
- Rick Aiello
- Posts: 4701
- Joined: 11 Sep 2000 12:01 am
- Location: Berryville, VA USA
- Contact:
What a marvelous job !!!!
------------------
<font size=1> Aiello's House of Gauss</font>
<font size=1>
My wife and I don't think alike. She donates money to the homeless and I donate money to the topless! ... R. Dangerfield</font>
------------------
<font size=1> Aiello's House of Gauss</font>
<font size=1>
My wife and I don't think alike. She donates money to the homeless and I donate money to the topless! ... R. Dangerfield</font>
-
- Posts: 694
- Joined: 3 May 2004 12:01 am
- Location: Summerfield Florida USA
-
- Posts: 3740
- Joined: 29 Oct 2002 1:01 am
- Location: Saginaw, Michigan, USA (deceased)
-
- Posts: 14
- Joined: 27 Apr 2005 12:01 am
- Location: Brookston, Indiana, USA
- Contact: