awsome job and beautifully done. I know what I speak of since I have made one myself.
I used the same pickups, they leave nothing to be desired.
Talking about cost... I found out if you want an instrument or case cheap, buy one . DIY is not cost-effective in times of mass-production and CNC milling, but it is eminently satisfying.
The downside is, if the instrument gets lost somehow, you´d be more sad than if you just bought one.
Thanks again, everyone! I've been playing it for a few more hours now, and it keeps getting better. It's interesting, the wood takes some time to stabilize and get accustomed to the string tension and vibration. Although it was good right from the start, it's now even more resonant, like the wood has to get used to being a musical instrument instead of a tree, and the molecules line up in a certain way so that it vibrates more freely, or something... I dunno. Anyway, it sounds pretty nice, and as it gets broken in, it'll only get better.
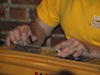
Don, the stainless steel legs and aluminum sockets were made by Don Burrows ( bsgsteelguitars.com ). He can give you the exact specs. I can only recall that the outer flange recess diameter was 3" and the inner was 1 3/8". I don't remember the depth, but this snapshot I took while mounting them should give you a rough idea of the size.
Thanks again for all the kind words. Carl, it's Eastern Maple, according the hardwood place I bought it from, but the curly maple body is a little less dense than the wood I used for the necks and keyheads that isn't quite as pretty.
I'm playing it a lot. When I get something recorded with it, I'll start a new thread for that.
I get birdseye and curly from a lumber yard in New Hampshire - the birdseye is hard , the curly is either soft or hard. If you can find a local supplier, you can save on shipping and get to cherry pick without dealing with returns. Great if you have the time
--carl
"The better it gets, the fewer of us know it." Ray Brown
A great job, Jerry. Welcome to the club, now lets see how long it is before you build the next one. Building lap steels is like potato chips... you can't eat just one and stop.
The question I would ask about the fretboard is, "What material did you print it on?"
I once printed a fretboard onto transfer paper, which is made with a backing that separates when immersed in water. That way the grain shows through when applied, and you varnish over the top of it to set the transfer. People who build models use a solvent called Micro-Sol to help waterslide transfers adhere to painted surfaces. When building instruments without a body cavity I usually apply my builder's label in that way, as I am of the opinion that the paper builder's label usually glued inside an instruments looks tacky when applied to the outside of a solid instrument.
The fretboards are not exactly identical. Each one has a unique background image that matches the wood underneath the neck. In a fleeting moment of vanity, I also put my name on the last fret of one of them.
On my earlier single neck, (the "When You Wish Upon a Star" guitar), I printed the fretboard on paper, and laminated it on each side with clear 5 mil plastic. By the time I made this, I no longer had access to a large format printer and laminator, so I had to go to Staples. These were printed on vinyl, the same material used for signs and banners. There are some advantages to this over paper; it's waterproof, and it makes a nice matte, non-reflective surface, albeit with a little less contrast than laminated paper. It is more subject to damage from abrasion, however, so If I do this again, I would coat them with spray lacquer after the ink has dried for at least 48 hours.
I made several designs to fill a sheet about 24" x 24", and cut them out by hand. Because it goes next to the black binding on the neck, I also had to go around the outside of the cut edges with a black sharpie. It's just put on the neck with glue-stick, so it can be easily removed and replaced if I decide I want something different.
Although I used Photoshop to make them, it doesn't really matter what you use to create the design, the main thing is that you end up with a PDF file that when printed at 100%, comes out exactly the right size. It's an easy, economical way to do it when all you need is one or two. If you were going to make dozens, then it's worthwhile to pay for the setup involved for silk screening or other commercial printing options.