Page 1 of 2
The continuing saga... Magnatone Lyric rehab project ....
Posted: 3 Feb 2017 11:56 pm
by James Phillips
Some of you handy folks wanna put your 2cents in towards this project in the works here.
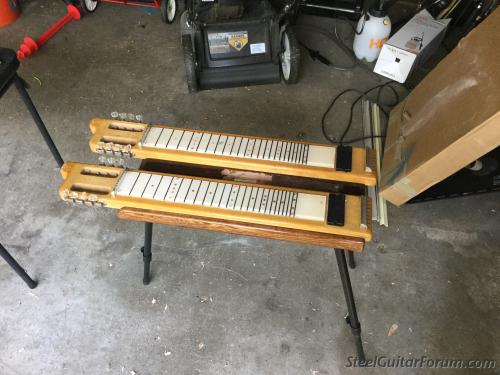
I got this pretty banged up double neck on Flea Bay ,a few years back...Poor thing is split in half,one pickup is coming apart,rusty tuners,etc..
I want to restore it but I don't think it can be brought back to stock ,without spending as much as a fine stock one would cost.
I would like to turn it into a gigging instrument,however,by doing the body and finish work ,then swapping the PUPS,and installing new tuners.
Anyone restore ,clean or otherwise polish these acrylic fretboards before? Do the metal covers effect the sound? If so,how? Or are they more of a "palm rest"? Any other insight on this instruments repair would be much appreciated.
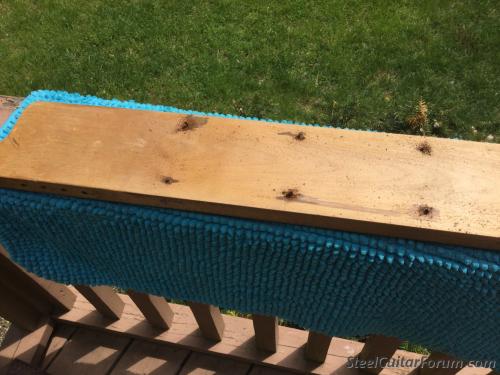
Split in two..


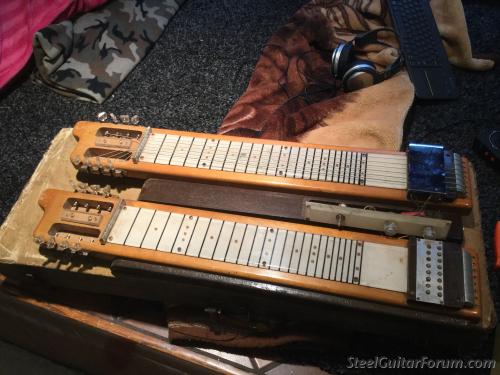
The Switch is bad...all the rusty screws,gotta go...
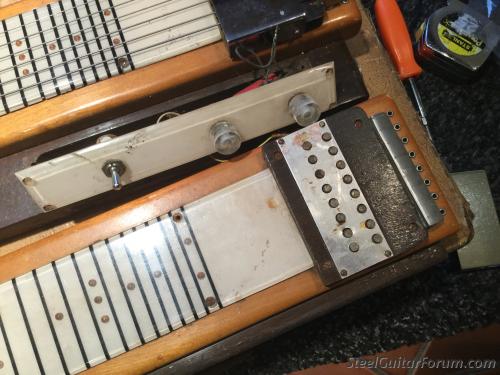
The pickup is noshed...and Yes,those are nails!
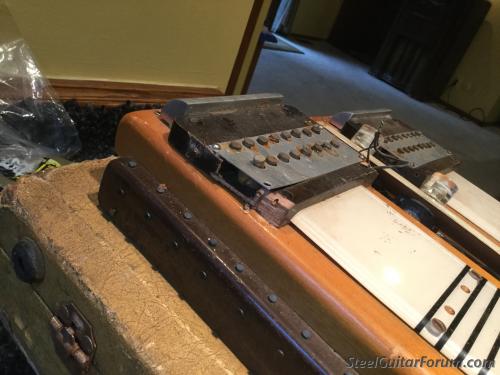
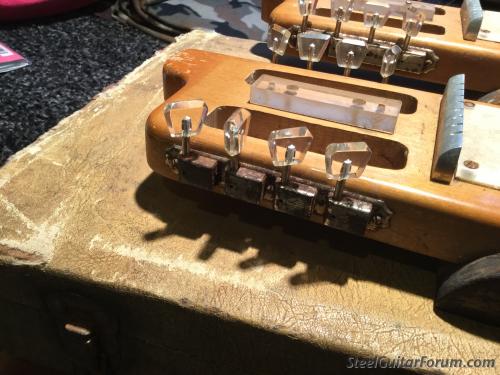
Rusty tuners, and missing one of the dark wood covers, of which I was never a fan of...
It's missing the Magnatone logo too,anyone got one or know where I can get a repro?
I feel like there is enough left ,to make a good sounding steel,with a lotta work,of course.
Thanks ,in advance.
Posted: 4 Feb 2017 4:07 am
by Scott Duckworth
Putting the "halves" back together is simple wood working.
If you are going to make it a player / keeper, I would "resto-mod" it. I'd put new tuners, pickups, bridges, nuts, whatever and make it a good playable instrument. If you have to patch some wood, hey, it adds character.
Posted: 4 Feb 2017 8:41 am
by Bill Sinclair
James,
Don't toss those distinctive acrylic tuners! I'm not sure of the best method but I'd look into something like Naval Jelly or phosphoric acid to dissolve the rust. Carefully bend back the tabs to remove the individual covers so the brass(?) gear can be removed and don't get any chemical on the acrylic part. If you don't want to fool with all that and decide to replace them, set them aside for the next owner to deal with.
I'd also look into a repair of the pickup that's falling apart. You may find that it's cheaper and easier in the long run than finding an 8-string pickup that fits and you won't have to do any routing of the body. Does the other pickup work? Once again, if you decide to replace and not restore (which is completely understandable), don't toss the original.
Posted: 4 Feb 2017 9:43 am
by Michael Lee Allen
You have one working pickup and the parts to the second so a rewinder actually has something to match up to and some parts to use. Handrests have nothing to do with the pickups and are not needed if you don't like/want them. The peghead covers are simply decorative, esthetic covering of the string ends and tuners. The handrests and the one peghead cover can be sold to somebody who needs/wants them to get you some of the pickup expense back. Same thing with the tuners if you can't/won't save them. Is the Lucite printed or is it a clear overlay with the markers underneath, been many years since I had one of these. Did you get legs or is this an early one with no sockets fitted? Glue it up, don't worry about the cosmetics, and shop around for quotes from a pickup rewinder. The wiring is easy, a basic Telecaster setup. The tuners can probably be saved.
MLA
Posted: 4 Feb 2017 9:52 am
by Jack Hanson
I have successfully rehabbed dozens of old Kluson Deluxe tuners, including the set on this Noble-branded 6-string Magnatone:

The Lucite-buttoned tuners that Kluson supplied to Magnatone are relatively easy to refurbish because the buttons don't disintegrate. Most white-buttoned Klusons of that era will inevitably require new buttons:

My method:
First, remove the tuners from the instrument (duh). Then let the strips soak shaft up in a shallow disposable dish (I use the plastic container from a microwave frozen dinner), immersing the works in naptha for a few hours. (I generally use Ronsonol due to its ready availability behind the tobacco counter in most grocery and drug stores.) A small wire brush at this point can work wonders removing dirt, corrosion, and rust from the metal stampings.
After a good soak I flush out the old lubricant by force-feeding naptha through a disposable pipette into the lube hole in each individual casing until the naptha runs clear. In extreme situations, you may have to repeat this operation using fresh naptha.
Finally, inject petroleum jelly (Vaseline) through a glue syringe into the lube hole in the casing. You can tell when there's enough when it begins oozing out of the slim crack between the casing and the plate. You will probably need to spin the shaft a few dozen times in both directions to loosen up the works, but 9 times out of 10 (or more) your Kluson Deluxes will function as they were intended for another 50-60 years or so.
Good luck with your project, James. Be sure to post more pics when your old Maggie is up and running.
Posted: 4 Feb 2017 10:05 am
by Michael Lee Allen
Posted: 4 Feb 2017 12:29 pm
by James Phillips
Thanks for all the good advice!
I think I will take the time,then to restore the tuners ,as the consensus seems to be that they are worth the effort.The first pick up does work ,but the second one is missing some wood pieces as well. I'm leaning toward replacing them as they where very cheaply made,and i'm a big fan of the Fishman fluence "Vintage Alnco".
It sounds great in one of my other 8 string,and I feel it would be a good upgrade. The Fret boards are painted on the under side. Any tips for dealing with those; chemicals to avoid, etc?
Michael Lee Allen wrote: Is the Lucite printed or is it a clear overlay with the markers underneath, been many years since I had one of these. Did you get legs or is this an early one with no sockets ?
MLA
No leg sockets but I might salvage from a Rogue six string. The fret board is painted on the back.
Special Thanks to Jack Hanson for that info.
...a little up date.
Posted: 15 May 2017 3:30 am
by James Phillips
Continuing the work on the Magnatone double neck....
The base was split. I added a thin peice of plywood to bond it back together, as it was cupped ....

In fact, the bottom screws where so rusted ; I had to drill out the heads , and remove with plyers . The tag on the bottom had carroded away.
Here is the new bottom... with side rails removed...
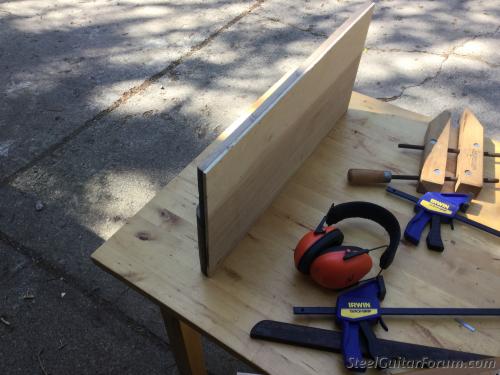
One of the side rails was cracked , so I fashioned two new ones from oak, the new ones are slightly taller to compinsate for the added depth of the base. This one hadn't been rounded out yet....

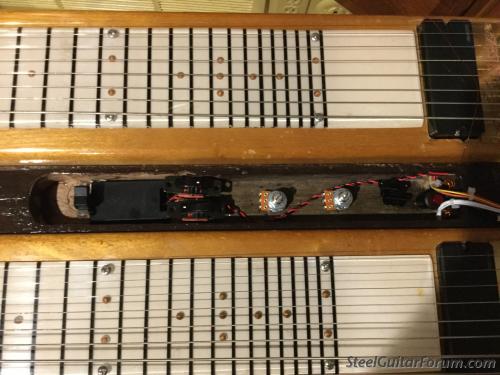
I routed out the body cavity a bit , so I can add more controls....

More to come...
More progress : D
Posted: 3 Jun 2017 9:20 pm
by James Phillips
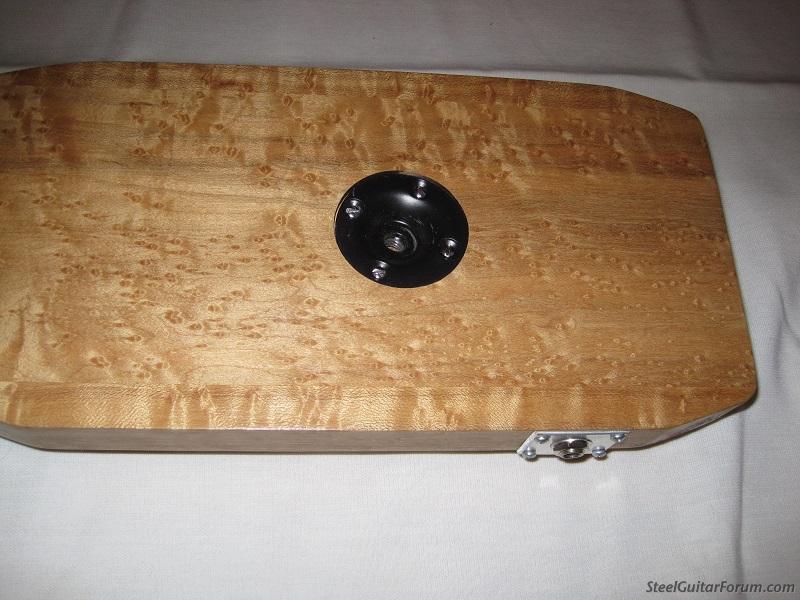
Here is a view of the lower body... I will add more coats of finishing to darken it up some. I also routed out a cavity for a 9 volt that will be accessible on the bottom side...

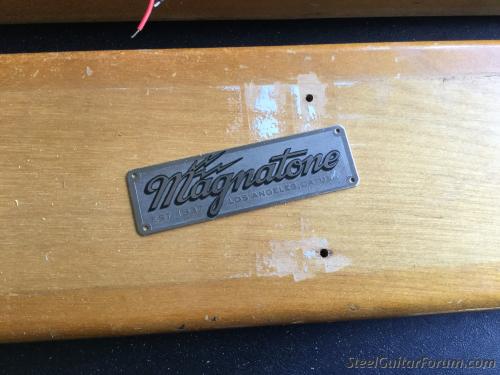
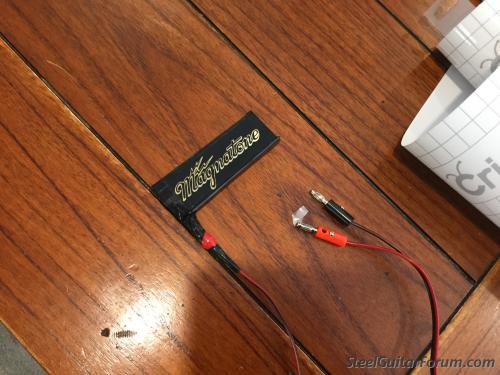
I found this logo tag that I will put on the front side rail. It's a reproduction, but I was happy to find it...
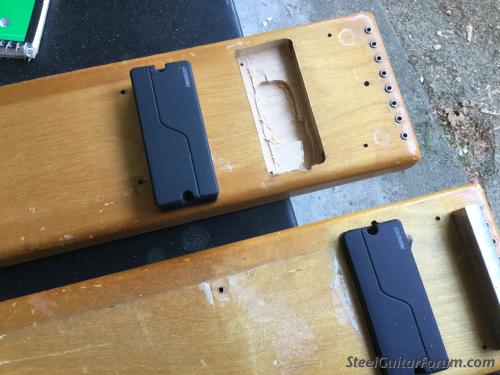
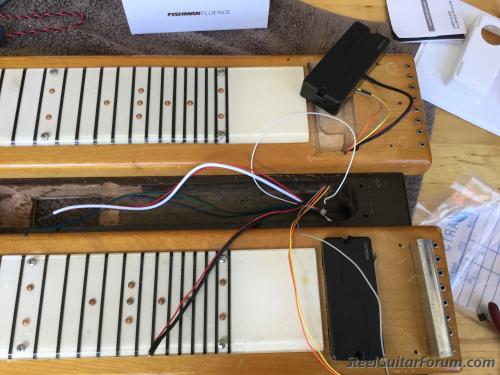
I routed out the two necks to accept a Fishman Fluence pick up. That's why I needed the 9 volt. I'm a big fan of these. Vintage tone, versitile , and dynamic ....
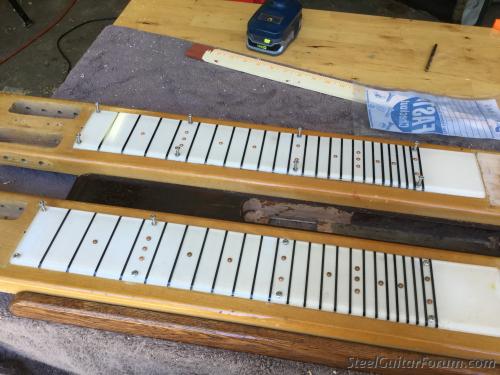
I hit the back of the two acrylic fret boards with white Krylon , to fill in a few spots....
Still some polishing to do..

Gotta remove sum rust from those tuners... I stole sum legs off a Rouge six string that I will use on this steel. I will post some more pics in a day or so, as I attend to theses things....
Posted: 5 Jun 2017 1:39 pm
by James Phillips
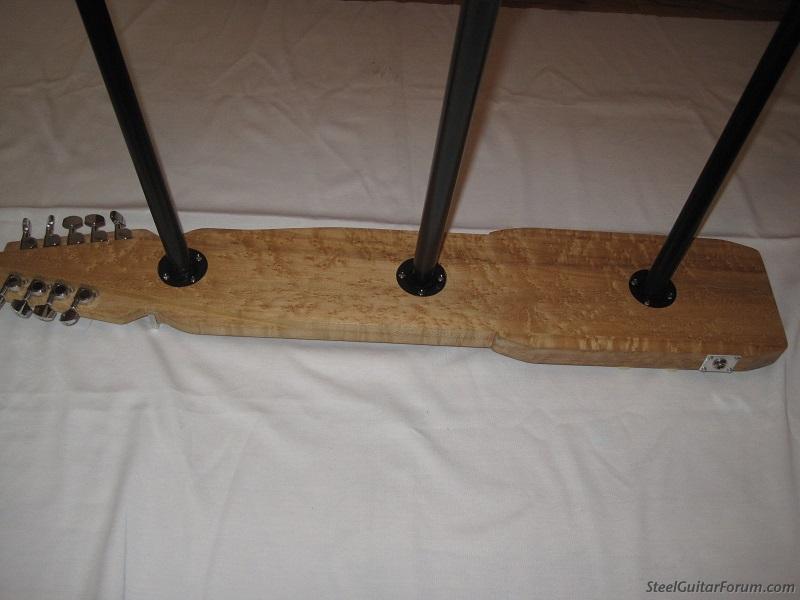
Here is the drilling for the leg sockets... you can also see the pocket for the battery compartment......I plan on covering the bottom with green felt.....

Here is a preasembly photo....

I still am looking for a sheet of brass,to fabricate a control panel, also some of you may have noticed that one row of tuners is short a tuner..I plan on installing a Hipshot so I can drop that major third to minor ,in an instant..
After prefitting the necks ; I realized that the top neck wasn't sitting nice and level. The bottom wood under that neck had 'cupped' and needed to be planed flat

I took the tuner that was in the worst shape and removed it to make way for that Hipshot tuner...

I also had to remove a little bit of wood inside the tuner cavity,, as I had to fudge it forward a bit....
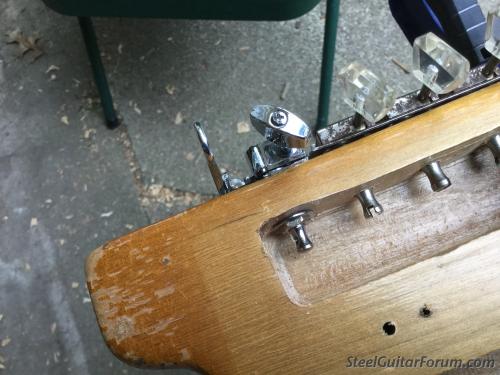
I have only one of the original wooden tuner covers, and it's cracked.
Wait till you see what I have planed as their replacements.ðŸ˜
Posted: 5 Jun 2017 7:41 pm
by Will Houston
Missed seeing this before, nice project!
Posted: 6 Jun 2017 4:21 pm
by James Phillips
Will Houston wrote:Missed seeing this before, nice project!
Thanks ,Will!
Posted: 10 Jun 2017 5:35 am
by Jack Hanson
Have been following this project from the beginning. A very impressive restoration that is obviously a labor of love. Looks like you're gonna end up with an instrument that's better than new. Congratulations.
Posted: 21 Jun 2017 5:46 pm
by James Phillips
Jack Hanson wrote:Have been following this project from the beginning. A very impressive restoration that is obviously a labor of love. Looks like you're gonna end up with an instrument that's better than new. Congratulations.
Thanks for the kind words Jack !
I don't know if I would describe it as a labor of love really. It's just that I've learned over the years if you don't take your time and do something right ; or at least to the best of your abilities; you'll regret it every time you look at it.
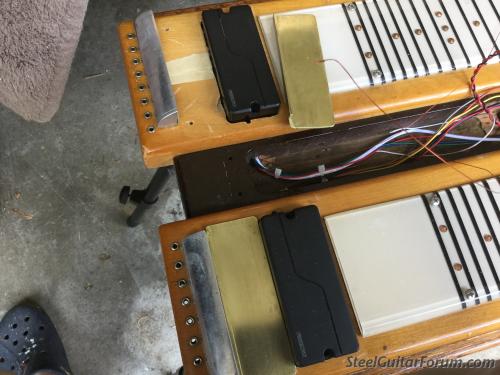
So.....here are the two necks, screwed down to the base....

The two fret boards actually polished up pretty well......
Here are the pickups with the wiring routed into the control panel cavity....
I'm still looking for a suitable sheet of brass to fashion a control panel...
Here is the felt , glued to the bottom side, plus battery compartment...

Getting pretty close... I prolly should order some strings....
Posted: 21 Jun 2017 6:12 pm
by Bill Creller
Nice work on that James !
Posted: 21 Jun 2017 7:41 pm
by Bill Sinclair
Hey James,
What length and width piece of brass do you need? I would think that scrap pieces would be pretty readily available in your state. I've got a 17"X7"X.050" plate that I could slice a piece off of with a jigsaw. You'd get to clean and trim it up.
I'll be very curious about how the hipshot works out. Great project.
Posted: 24 Jun 2017 9:06 am
by James Phillips
Bill Sinclair wrote:Hey James,
What length and width piece of brass do you need? I would think that scrap pieces would be pretty readily available in your state. I've got a 17"X7"X.050" plate that I could slice a piece off of with a jigsaw. You'd get to clean and trim it up.
I'll be very curious about how the hipshot works out. Great project.
Thanks for the offer ,Bill...
I need a piece that is 14"x 2".
PM me for my address and I can reimburse you for shipping,and stuff.
Thanks!
Posted: 24 Jun 2017 10:39 am
by Joe Elk
Been following your project LOOKING GOOD!!!
It is a shame that Rogue doesn't sell the legs individually. It would good for builders that do not want to to invest a ton of money.
Joe Elk Central Ohio
Posted: 1 Aug 2017 4:52 pm
by James Phillips
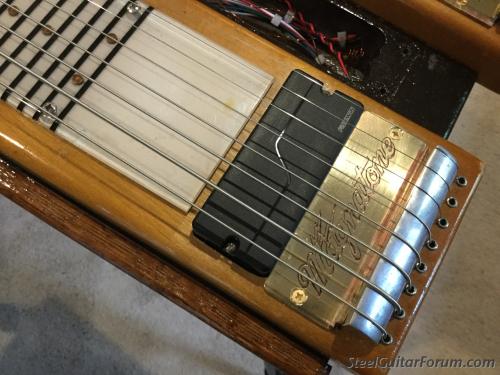
I felt that it was necessary to fashion a couple of brass plates to go between the pickup and the bridge. This plate would keep the bridge from shifting ,cover some holes from the old pickup,and also allow me to run a ground wire thru a notch I put on the surface, saving me from trying to drill a hole at an impossible angle..
First , I bent a 90 on a couple of brass plates...

A little shaping and polishing....
I created a vinyl stencil and affixed it to the plate....

...and attached an electrode...
Then , each plate is etched in a bath of water, salt and vinegar, while applying about 12 volts of DC ....
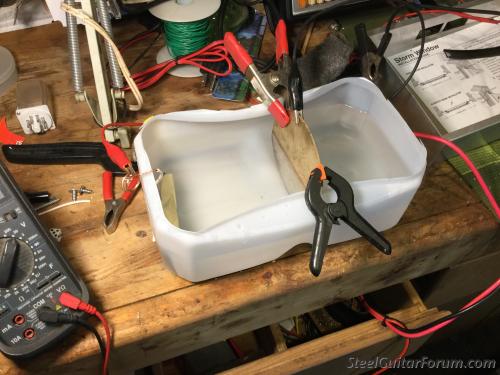
Holes are drilled and the screws are inset....

She is all strung up now... I still need to fabricate the control plate and wire up the electronics. I will also make sum headstock covers, as well .

Close to done....my modified E6 (6,1,5,1,3,5,1,6) tuning on the bottom neck & straight A6 on the top..

Posted: 1 Aug 2017 7:20 pm
by Will Houston
Don't stop now
Posted: 2 Aug 2017 4:03 am
by C. E. Jackson
James, lots of work, but a great job. I have a 6 string Magnatone, and the A6 tuning sounds great on it. You will certainly enjoy this restoration.
C. E.

Nice job
Posted: 2 Aug 2017 9:50 am
by Andy DePaule
Looks like you have the project well in hand.
Nice work and bringing a cool old steel back to life.
Don't think my advise would help much.
Posted: 3 Aug 2017 4:05 pm
by James Phillips
...so ,next I lay out the switches and other controls, to get a feel for the ergonomics.
I will wire them up and fool around with them abit ,to see if I like this configuration. Then, I with make a plate to support them...
Magnatone Lyric
Posted: 4 Aug 2017 9:47 am
by George Rothenberger
James, I did the same thing with the legs - Took from a Rogue 6-string. The legs work ok. Had to route out the base to insert the cups but worked.
Question:
How did you create the vinyl stencil for the Magnatone etching? Is it a sticky-backed thing?
I am looking at restoring a Magnatone too.
Keep the old PUPS, they are very warm and balsy. AT least keep them on hand!
-george
[/quote]
Re: Magnatone Lyric
Posted: 4 Aug 2017 5:13 pm
by James Phillips
George Rothenberger wrote:
Question:
How did you create the vinyl stencil for the Magnatone etching? Is it a sticky-backed thing?
I am looking at restoring a Magnatone too.
-george
I used one of those vinyl cutting machines..(CriCut)..yes it is a sticky backed vinyl, I uploaded the image into their software,and sized it to my liking.
The logo itself ,I salvaged from a photo of the logo plate, itself.It was a ton of work, turning that photo into a black and white image, but well worth the effort. Let me know if you need it , I can email you the JPG.

