Page 1 of 2
Rebuilding a Simmons Genesis
Posted: 26 Mar 2015 5:55 am
by Paul Hoaglin
So my first "entry level" Simmons Genesis steel has been returned to me, and all of its "quirks" (read:
faults) have been exposed during its time away from me. I've now logged so many hours underneath my MSA Classic D-10 that I now feel confident that I can rebuild the undercarriage basically from scratch and make for a better, more mechanically-reliable steel, assuming I feel well enough to follow through all the way (I have ulcerative colitis, and that really puts a major crimp on my energy level most days). In the end, I think it'll probably go up on the Classifieds.

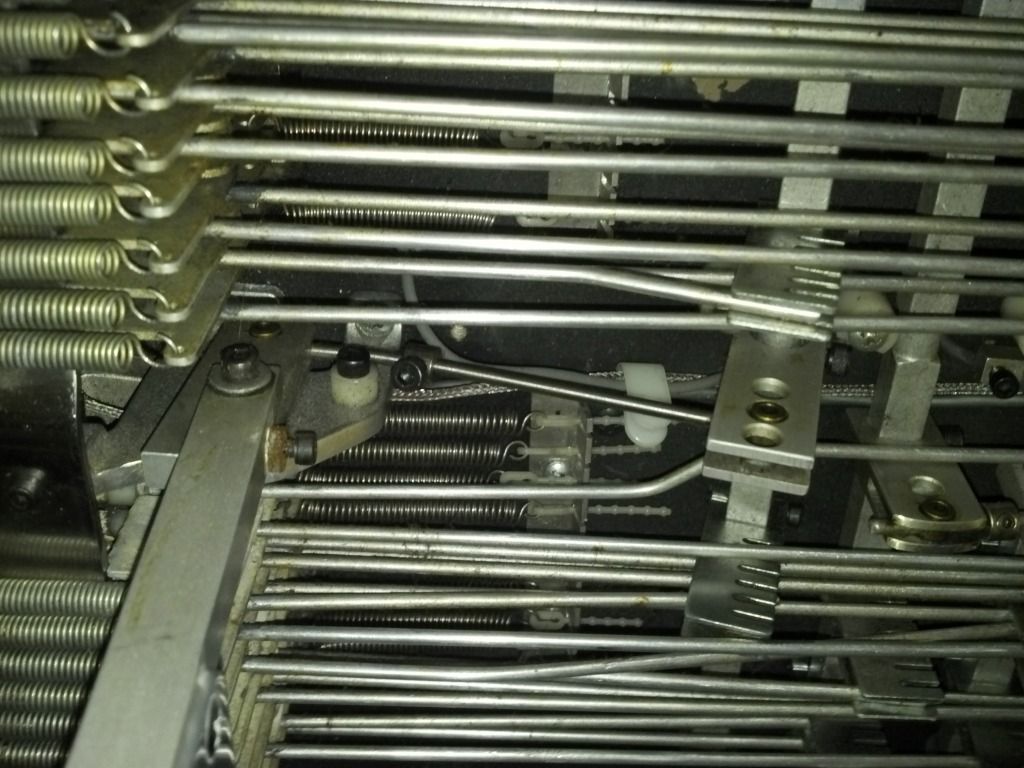
But for now (sorry for the crummy pictures):
http://s224.photobucket.com/user/paceal ... 20re-build
I've dismantled
everything. One thing that bugs me is that Bob didn't take advantage of the one HUGE benefit of using the pull-release changer: having the fingers make contact with the wood on the raises. So I plan to plug and re-route the changer hole so this is the case, which will change the tuning procedure, but should result in a much better-sounding horn overall. We shall see how I do in the instalments to come!

Posted: 26 Mar 2015 6:10 am
by Paul Hoaglin
The other big change I need to make is to change the way the lowers' springs work to make them reliable and adjustable. Richard Burton's various Marlen-related posts and diagrams are going to help tremendously with that re-design. I need a.) for the spring tension to be adjustable; and b.) for the mid-point note on the strings that both raise and lower to be solid. I believe I can accomplish this using Richard's, and others', posts as my guides....
Posted: 26 Mar 2015 6:48 am
by Lane Gray
Richard's method of tuning open notes got replaced on later Marlen guitars.
The lowering rod ended up threaded, with tuning "nuts" (the typical Marlen barrel things) would tune the open note (E on 4 and 8, G# on 6)
Congratulations on the project. I love that pull-release tone.
Posted: 26 Mar 2015 9:45 am
by Paul Hoaglin
Yes, Lane, thanks for pointing that out - that's almost certainly how I'm going to try to arrange the tuning of the "middle" note. Largely because it makes sense in general, and also because it fits the workings of this particular guitar. Now I just have to come up with the best way to get those lowering rods across the underneath of the body.
Also, the copedent has me stymied at the moment, because what I'd put on it if I were planning on keeping it would be very different from what I might if I were going to try to easily flip it (which is more likely going to be necessary). In either case, I'm planning to add a LKV - but to do what? If it were my guitar, it'd raise 1 & 7 a halftone. But that change is already on RKR. To do my coped, RKR would lower 2 & 9 with a half stop - but that's currently on RKL! Along with the 6th string whole tone lower I added to it before I "long-term-loaned" it. Rigging it up to lower 5 & 10 wouldn't be so bad if my new lowers system works out, but those strings are so critical because of the A pedal that everything has to be mechanically solid for me to consider it. Hmmmm. (Plus RKL is where I lower those on my coped.) It's quite a puzzle. I suppose a free-standing reversing bracket from Michael Yahl would solve the RKR issue, but is that cheating? (I guess I could build a similar one myself.) Ah, tough choices....
Posted: 26 Mar 2015 10:05 am
by Lane Gray
For reversing levers, I'd buy one of Bruce Zumsteg's, I love the way he does it, and if Bob used ⅛“ pullrods, it's completely compatible.
If you're completely going over it, I'd say set it up the way you want it.
Posted: 26 Mar 2015 12:32 pm
by Paul Hoaglin
Thanks, Lane - I did actually do a search to see if I could see one of Bruce's design, but couldn't find a pic here. Have you got one or a link to one? Perhaps I could replicate the principle.
Posted: 26 Mar 2015 12:42 pm
by Ian Rae
Don't know whether this is of interest, Paul, but when I was fixing up my old D10 (not a full rebuild by any means), I used a piece of 1/8" brass plate as a raise stop. Great tone and solid intonation.

A piece of steel might be as good (and it would be a lot cheaper!)
Posted: 26 Mar 2015 1:32 pm
by Paul Hoaglin
Thanks, Ian - that is of great interest. I'm still puzzling over the various ways to achieve the other goal of a solid and adjustable "middle" note. That image gives me some interesting ideas to go with that might kill two birds with the same stone....
Pull and release pedal steel guitars
Posted: 26 Mar 2015 4:06 pm
by Jim Horan
I have modified many,many pull and release pedal steel guitars, including Mavericks, Marlen, MSA Side kicks, GFI, Little Buddy, and Built right.
The most critical is the 4th string, having to raise twice and lower once. I modify the changer fingers on the 4th, 5th and 8th string. On the 4th I use a perment rod on the C pedal raising to F, tuning with the keyhead. The 4th is spring loaded, so tune the open E tuning using the nylon tuning nut. on The 4th string raise the E to F tune the other nylon nut. to tune lower E use socket head screw behind the changer.
to tune the F lever raise use the other nylon nut, Use a stop on this lever. On the C pedal use a permant rod on the 5th string and tune with key head. A pedal raise, tune the 5th string with the nylon nut. I also cut aa hole in end plate, so all the tunning is from the top, sitting down
The rest of the pulls are tuned at keyhead and tuned open with socket head screws behind changer.
As for Parts, they cost more than the steel, or don't have them. Lane would not approve, but I make most of them or use Generic


Posted: 26 Mar 2015 4:59 pm
by Lane Gray
You misunderstand me. I approve. I wouldn't do it that way because my metalworking skills are crap. So I buy parts.
I think I'd use a half tone tuner on the F lever and share the C pedal pull rod. But that's just how I'm used to it.
Posted: 26 Mar 2015 6:28 pm
by Bill Moore
About the E, "middle note" on the 4th string; On my Marlen, it works like this. The lowering rod, which has spring tension on it, holds the finger in a central position. This rod has a nylon tuning nut behind the changer finger, which is used to tune the E note. The F# is tuned at the keyhead. The F note is tuned by adjusting the travel on the F lever. The lower is tuned with the screw behind the finger.
This doesn't affect the 8th string at all. On the 8th, tune the F raise at the keyhead. Tune the open note with the nylon tuner on the lowering rod, just like the 4th string. Tune the lower note using the screw behind the changer finger. It works fine and there is no need to use a half tone tuner on the 4th string.
Posted: 27 Mar 2015 11:09 am
by Paul Hoaglin
Tuning the 4th string should be dead simple if I keep the basic elements of Bob's changer design. The lower is spring-loaded, and if I alter the method like Lane suggests, the open E note will then be tuned at the changer by adjusting the tension of the spring with a hex tuner. A second hex tuner tunes the F lever, and a third (possibly with a shock spring) simply brings the changer finger into contact with the "body" (I'm now leaning towards Ian's way of accomplishing that, steel or brass, whichever is easier/cheaper/better - pick two).
Thanks for all the ideas, guys. Still waiting for Speedy Metals to be as speedy as it has been in the past, and then it will be rebuild/reassemble/sell time....
Posted: 30 Mar 2015 8:51 pm
by Paul Hoaglin
Speedy Metals is speedy. Well, sorta.
So, I decided to be brave and drill the new, "improved" front apron bracket:
http://s224.photobucket.com/user/paceal ... racket%201
Well, it's "improved" because the F lever (or LKL rather) will go all the way across into it, as will the LKR E lowers (except, well, I'll get into that in a bit) and my experimental vertical lever shaft as well. The metalwork? No, I admit; not a whole lot of visual improvement, nope. Nada. Zilch. (Well, technically, my holes are a
little bit closer to being straight than Bob's.) BUT, functionally speaking, there
will be improvement, in spite of aesthetics, and I intend to prove it with soundfiles and BoopToop videos and suchlike by the time it's all done.
Now, I need to make the opposite apron bracket piece to match, and then decided how (and exactly where) to make the LKR reverse. Any help with examples of Bruce Z's reverser, there, Lane? I have plenty of general ideas of how to do it, but I want to end up with the actual lowering crossbar as close to the changer as I can get it (i.e. in the centre of the guitar would be nice), so all the nice adjustable lowering springs I envision so well can get hooked up in the space in the centre between the "wastes" and these outlying shafts.
I'm also considering routing about 1/8" down in front of (or on the side of ) the changer in order to do that 1/8" bass or steel changer trick Ian showed us all, and to still have room above it for the lowering spring-loaded rods to do their thing unimpeded. Trying really,
really hard not to despair or lose my nerve - I
really need this steel to come out better, and come out worth more ($-wise) than it was when I got it back - I'm in a real pickle....

Posted: 31 Mar 2015 5:42 am
by Dave Zirbel
I used a piece of 1/8" brass plate as a raise stop. Great tone and solid intonation.
So did the fingers not reach the wood body for the raises or do you just find a metal stop to be tonally and mechanically superior?
Got a '59 ShoBud Perm on the bench right now. My first experience with pull/release!

So Paul, I guess Greg gave up on pedal steel?

Posted: 31 Mar 2015 6:46 am
by Lane Gray
I knew I was forgetting something. I'll try again on my break
Posted: 31 Mar 2015 6:51 am
by Lane Gray
You can kinda see on this guitar
bb.steelguitarforum.com/viewtopic.php?t=278179
Posted: 31 Mar 2015 8:20 am
by Paul Hoaglin
Dave Zirbel wrote:
So Paul, I guess Greg gave up on pedal steel?
I had posted a different reply, but it seems, apparently yes. PM for "otherwise"....
Posted: 31 Mar 2015 8:29 am
by Paul Hoaglin
Lane Gray wrote:You can kinda see on this guitar
bb.steelguitarforum.com/viewtopic.php?t=278179
I'm assuming mainly on the two LKRs, correct? I get the general gist. I like it - very direct. I'm going to try to come up with something like that only "going" the other way, i.e. the real crossbar that moves goes changer-side rather than keyhead-side from the lever. May require some "lateral thinking" to do it with what I've got, but I'm nothing if not a lateral thinker....
Posted: 31 Mar 2015 8:54 am
by Lane Gray
Yeah. If you can follow a description, the lever pivots well above the shaft, with a transverse rod coming off between pivot and deck, so it reverses ON THE BRACKET. Then the link rod is moving in the right direction, and off to a slave shaft. It also allows a lever to live where there's another rod.
Posted: 31 Mar 2015 9:42 am
by Paul Hoaglin
I do think I get it now, based on both your description as well as those pics. Really smart. Could be a great move for the new RKL. AND a variant on a new RKR, since I think those changes are moving to the new LKV that I'm most likely going to make.
Okay, so now to make the new opposite apron piece(s), and finally decide what to do about finger-to-body contact....
Posted: 31 Mar 2015 12:00 pm
by Lane Gray
Here's a view of my RKL
Posted: 2 Apr 2015 3:26 am
by Paul Hoaglin
That's a great pic, Lane - thanks! More to stew on - I've felt like total dog poop physically for the past few days and so haven't been able to work on it. But now's thinking/planning time anyhow....
Slight progress...
Posted: 6 Apr 2015 5:53 pm
by Paul Hoaglin
Well, I finally made a tiny bit of progress on this thing. No pics yet, because I only barely had enough energy to do the work, and had none left over for photography too. But I did build a new L-shaped bracket for mounting the crossrods on the front apron, and "repurposed" the old L-bracket on the other apron, so, while it has some superfluous holes in it, it's far more securely anchored than it was, and now the LKL has a nice solid (hopefully!) stop, which was the whole purpose of making the change.
So now I've started re-assembling it (losing screws all over the place in the process, of course), and am working my way from the A pedal onward towards the changer. The benefit of doing it that way is that I'm only dealing with raises so far, so I can postpone my decisions on how to deal with the lowers a little longer.
Next: making a final decision on how to implement a solid body stop for the raises. I'm thinking of combining Ian's metal plate idea with a chunk of wood in the hole, which would be screwed onto the plate, which in turn would be screwed to the body. That way the plate can be relatively thin and not get in the way of the lower rods. But I've got to figure out the clearance necessary to allow the maximum movement for the strings that need it (the 4th string is probably the best gauge of that). Pfew. A lot of work for someone who's not really able to do much at all....
More progress
Posted: 11 Apr 2015 9:51 am
by Paul Hoaglin
I finally cracked the issue of "body" contact on the raises! I was spending way too much time looking at the problem from the undercarriage side, that I totally missed looking at possible "up-top" solutions - until now. So here's what I came up with:


The new piece is the bar across the top that stops the fingers at their widest part, rather than at the narrow bottom. It screwed right in where two mounting holes already existed, so it is basically non-invasive (and thus reversible too if for some reason it proves necessary). I have only just started putting strings and pulls back on, but with "finger tests" (moving the fingers with my own fingers) it seems to work great so far.
Oh, and here are those L-brackets in the undercarriage:


Now all I need to do (besides actually reassemble the thing in general) is to design and perfect the Marlen-style spring-loaded tunable open note system for the lowers, and this horn might just live again after all....
Posted: 12 Apr 2015 1:10 am
by richard burton
On my Marlen, the open position is fine-tuned by the 'at rest' position of the lowering knee lever.
I set it up as follows:
Position the knee lever to your liking, then set the collar (see diagrams) on the lowering rod as accurately as possible, so that any fine-tuning of the open position does not radically move the knee lever from its optimum position.


