Page 1 of 2
Aluminum FryPan, 8 string, project in the works
Posted: 22 Nov 2014 12:22 pm
by W. Johnson
I decided to build a Frypan style lap steel guitar. I really like this kind of guitar design, but it's way out of my price league. So, I'm building my own, using two pieces, one for the neck, one for the body, and bolting them together using 1/4" bolts with nuts (solid as possible connect). Here are a few initial in-the-rough pics:


This is 22.5" scale, 8 strings, probably tune to C6. The pickup will be my own wind, I'm thinking around 10K single coil, and ability to raise lower easily to change tone, tone and volume dials on top, cable input on side or offset on end.
I'm going to mix polished aluminum finish, with some thin wood veneer (curly maple or something), try to give it a unique look. Entire bottom may have veneer cover, portions of top, side will remain visible aluminum and polished.
Right now it's a work in process, another week or two to complete.
This ones going to be my own, I'm not selling it.

Wayne
Posted: 22 Nov 2014 1:04 pm
by Ron Whitfield
Cool. Plenty of interesting and wonderful things are happening around here currently.
Posted: 22 Nov 2014 1:05 pm
by Joe Breeden
Great idea and looks well thought out..Keep us posted.
Posted: 22 Nov 2014 2:31 pm
by Jay Fagerlie
You should be building two Wayne!
Sell the second one (to me, of course) to pay for the both of them!
Posted: 22 Nov 2014 11:10 pm
by Roger Shackelton
Hi Wayne,
You may want to think about building a stand for your fry pan guitar, as it looks too heavy to be resting on your lap.

Roger
Posted: 23 Nov 2014 12:47 am
by Bill Creller
That project looks good ! Should be interesting to hear the difference ( if any) between a billet and a casting, for a frypan. Maybe a bit more "ring" to billet aluminum than a casting (?)
Nice job on that !
Bill
Posted: 23 Nov 2014 6:09 am
by Tom Pettingill
Cool project Wayne

Posted: 23 Nov 2014 6:28 am
by W. Johnson
Roger Shackelton wrote:Hi Wayne,
You may want to think about building a stand for your fry pan guitar, as it looks too heavy to be resting on your lap.
Roger
It weighs just over 10 pounds, as my shipping scale only goes to 10 pounds ( I need to get a scale with higher weight limit). I'll weigh each part when I take it apart. Right around 11 pounds I think, 'bout the same as my other aluminum guitars. The body is a 2" length cut from a 7" round aluminum bar, the neck began as a 3/4" thick by 4" wide flat bar. I could reduce the weight if needed, but more mass means more sustain.
Wayne
Machinery Used
Posted: 23 Nov 2014 7:09 am
by George Piburn
Can you talk about and snap some photos of the various machines you are using?
Re: Machinery Used
Posted: 23 Nov 2014 5:19 pm
by W. Johnson
George Piburn wrote:Can you talk about and snap some photos of the various machines you are using?
For the lathe work, I use a 12x36 lathe. I also have a small mill. Neither are CNC, but are manualy operated.
Wayne
Mill is good
Posted: 23 Nov 2014 5:58 pm
by George Piburn
With your having a mill --
Seems like you can create fixtures to hold the head of your laps at an angle to trim them to 1/2" thickness at a slight downward angle top and bottom.
This would really make them happening and unique as well as solving all sorts of Nut - to strings Pressure Issues.
Re: Mill is good
Posted: 23 Nov 2014 7:26 pm
by W. Johnson
George Piburn wrote:With your having a mill --
Seems like you can create fixtures to hold the head of your laps at an angle to trim them to 1/2" thickness at a slight downward angle top and bottom.
This would really make them happening and unique as well as solving all sorts of Nut - to strings Pressure Issues.
(I have vices for my mill, that hold parts at angles. )
Good idea. I've been giving that some thought, actually.
Usually I machine out the inside of the head, which works nicely:

I've also given thought also to machining a bolt on head, which is angled down slightly.
Wayne
Posted: 23 Nov 2014 8:22 pm
by William Rosen
Once you have the dimensions worked out and described on a CAD drawing, you can probably get this "carved" in one piece using a CNC router cutting machine.
Bill R.
Seattle
Posted: 25 Nov 2014 11:21 am
by W. Johnson
Here's a picture (in the rough) of the way I machined the head:


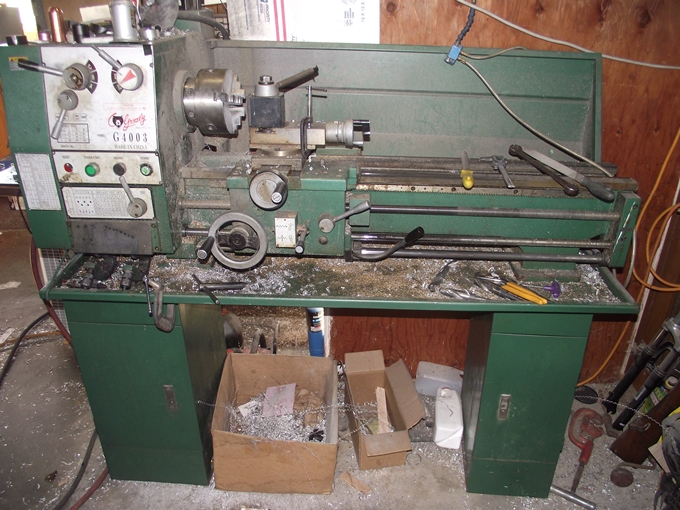
George asked about my equipment, here are a few pics:
My Mill:

One of my lathes (I have several):
Still considering an offset downward flat head (not machined out in the center), tuners come up from underneath. The design of the head is a bit short, I was trying to get it short as possible. In future guitars I will probably stretch it out a bit longer.
Wayne
Worth the leap of faith
Posted: 25 Nov 2014 3:56 pm
by George Piburn
I think it is worth your effort to do the angled head with normal guitar style tuner positions.
You have taken this to such an extent , - may as well take it all the way.
Technically it will be stronger and have more sustain too being more solid.
It will look more like a Rickenbacker too.
Regardless of your final decisions, you have a cool thing going.

Re: Worth the leap of faith
Posted: 26 Nov 2014 9:46 am
by W. Johnson
George Piburn wrote:I think it is worth your effort to do the angled head with normal guitar style tuner positions.
You have taken this to such an extent , - may as well take it all the way.
Technically it will be stronger and have more sustain too being more solid.
It will look more like a Rickenbacker too.
Regardless of your final decisions, you have a cool thing going.
I did some prototyping in my CAD program. I can get more angle with 1" bar stock than with the 3/4" in this neck. Next one I make I may experiment with a neck and head with angle.
I was not exactly trying to copy the exact look of a Rickenbacker. Anyway, here are a few pics of a Rickenbacker, one from side, and front and back of the headstock:
Side View:

Head front:

Head back:

With 1" bar stock, I can get a 5 degrees angle. If I groove into the head and set the tuners down into it a bit, like the original Rickenbacker, it will get another 5 degrees perhaps, which may be enough angle, and will have more of the original Rickenbacker look.
I'm not sure I like the idea of the tuners on back side of head, might still use modern grover tuners and come in from side.
I may do this on my next build. The thicker aluminum bar cost a bit more, and a lot more machining is require, but might look pretty cool.
I've already got the head and neck for this guitar completed, and I've made the nut and bridge, so I will go ahead and complete it as is. Neat thing is, in the future the neck can be removed and changed to another style, or even a longer scale.
BTW, I purcased a few Georgeboards printed fretboards, one goes on this guitar, another goes for a customer's LaPedal-8, an 8 string lap steel guitar I'm building.
Wayne
Posted: 26 Nov 2014 10:04 am
by Mike D
Holy flying chips Batman, that is some cool stuff!
Head angle -
Posted: 26 Nov 2014 11:45 am
by Raymond Jones
Am I being to obvious? use the 3/4' stock and put a bend in it before machining.
Re: Head angle -
Posted: 26 Nov 2014 4:56 pm
by W. Johnson
Raymond Jones wrote:Am I being to obvious? use the 3/4' stock and put a bend in it before machining.
Bending the aluminum may be an option.
Wayne
Posted: 26 Nov 2014 8:02 pm
by Don McGregor
I know they are pricey even when they are available, but I hope you manage to acquire and install a horseshoe pickup in one of these babies. If anything deserves it, this does. I love what you are doing with metal.
Re: Mill is good
Posted: 27 Nov 2014 9:01 am
by Russ Cudney
W. Johnson wrote:George Piburn wrote:With your having a mill --
Seems like you can create fixtures to hold the head of your laps at an angle to trim them to 1/2" thickness at a slight downward angle top and bottom.
This would really make them happening and unique as well as solving all sorts of Nut - to strings Pressure Issues.
(I have vices for my mill, that hold parts at angles. )
Good idea. I've been giving that some thought, actually.
Usually I machine out the inside of the head, which works nicely:
I've also given thought also to machining a bolt on head, which is angled down slightly.
Wayne
That's like the MSA lapsteel headstock. I like it.
Posted: 30 Nov 2014 4:26 pm
by W. Johnson
A little progress......


The wood id myrtle, 1/8" thick. Decided to inset wood on the back, use for the fret board, and will also use for the pickup.
The bridge, nut, and pickup cover all need polishing. For the bridge I decided to make the bar in the center, in hopes of better vibration transfer to the body.
This is the prototype, anything can change. I'm just experimenting with ideas.
Wayne
More Details
Posted: 1 Dec 2014 7:22 am
by George Piburn
Wayne ,
Looking good ,
It will be very worth it for you to:
Put a 1/8 Radius on the Corners of the back of the Nut Floor -- Both sides of the Bridge Floor and all 4 corners of the Pickup plate
All of the top corners of the Nut and Bridge need little radius too.
If you put a 45-60 degree angle or round over on the nut and bridge leaving 16th flat will make a big improvement too.
Lastly make sure to soften all of the sharp edges with your buffer.
All of those sharp corners can cause serious injury to our older skin. Plus it lends to the over all roundness of the art piece. At this point Elegance is a necessity.
Posted: 2 Dec 2014 8:21 am
by W. Johnson
Posted: 3 Dec 2014 6:15 pm
by W. Johnson
Here is the beginnings of the guitar pickup for my frypan. The wood is myrtle, to match the rest of the guitar. I'll probably wind it kinda hot, but not sure how hot, maybe 10K or something.
I use an old mini lathe I've had lying around for ages, and rarely use for much. I made an adapter to fit into the lathe jaws, which hold the pickup bobbin. The lathe has variable speed so it works pretty good. I have a digital turn counter, but I mainly go by the weight, and can tell how much wire I've used this way. Kind of fun to do, but not really all that easy.
The magnets are Alnico A5. I use 42 AWG, which has less resistance than 43 AWG, so it takes more wire to get the higher resistance, which means it has more inductance, and it's hotter than the resistance might tell you.
I have some brass eyelets, which I need to put in.


