Page 1 of 2
Building an amp from a kit
Posted: 29 May 2009 3:49 pm
by Ben Jones
I am buiding a tweed deluxe kit from Mojo.
I thought I'd start this thread, cause i know I'm gonna need some help, but also to share my exprience in case others are wanting to try this also.
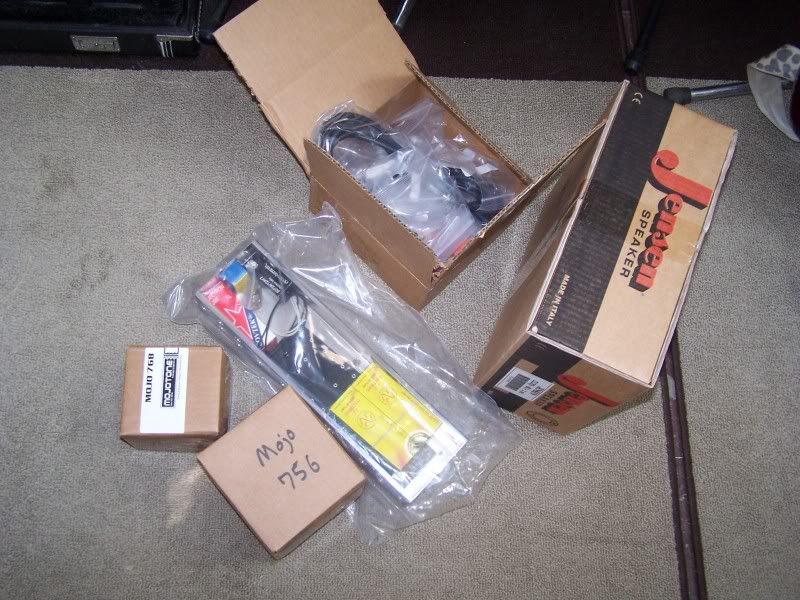
The kit arrived 5 minutes ago.
After much debate and advice taken, I decided on Mojo over Mission and the much less expensive Weber kits. When ordering online from Mojo, one cannot check on the availability of kits and cabinets in stock. nor do they tell you when something is out of stock. My kit arrived today with no cabinet. That is very disappointing and surprising as there was no indication when it shipped that it was a partial shipment nor that anything was not in stock. There is no indication on the packing slip nor online of when my cabinet will be shipped or how long it might be on "backorder".
The "kit" contains no instructions, not even a layout...not even a parts list!! okay i didnt expect instructions, but i did expect a parts list at minimum.
so thus far, thumbs down on Mojo's communication skills and customer service i guess.
Posted: 29 May 2009 8:15 pm
by Joel DeGarmo
I would use the layout from the weber kit at least to get you started. When it comes to the taps on the transformers you might have to make adjustments but from a parts and layout standpoint, use the weber diagram.
Posted: 30 May 2009 7:28 am
by Lee Warren
Hi Ben,
It's disappointing to hear that your project started this way.
I'll be watching your thread with interest and hope it goes smoother for you from here on out.
Lee
Posted: 30 May 2009 7:40 am
by Ben Jones
Looking more at Mojos website they do explain that cabinets take a few more days to ship...but you really have to dig to find that info on their website and there was nothing in the box to let you know. okay, I had a hissy fit over the missing cab but i am over it now.

parts list tho? man, why not? having built alot of pedals from kits I learned to check the parts list before starting, the parts pickers always seemed to miss one or two things.
anyway, wow this is daunting with no instructions at all. Ive spent the morning looking at pictures of 5E3's online and they all look a bit different to my untrained eye.
Posted: 30 May 2009 8:40 am
by Lee Warren
Hi Ben,
Hopefully you'll get the cabinet soon.
If only they would tell you what to expect!
I recently completed my first kit project: an amp conversion / upgrade.
It's an 18watt circuit based on a mid 1960's Marshall design, using 2 x 12AX7s and 2 x 6BQ5s.
I retro fit it into an Epiphone Valve Junior box, using only the Epi power transformer and chassis -- all other components were removed or replaced.
One of the kit suppliers sent some wrong parts (incorrect value resistors).
Not a big deal, but frustrating.
Also, one of the brand new JJ 12AX7's turned out to be lame.
To the naked eye, it lit up and looked just like the one next to it (no cracks, burn marks, cloudiness or other anomalies).
That was very frustrating because it worked, just not properly, giving erratic amp performance and voltage readings.
Having said all of that, the end result has been very satisfying and I'm ready to start another project.
Good luck with your project.
I'm sure you'll enjoy the process --even the bumps along the way carry their own reward.
Ultimately having an amp that you built is a great feeling!
Keep us posted on your progress.
Lee

Posted: 30 May 2009 9:49 am
by Jon Light
Ever see the episode where Homer S builds the backyard grill he got from the Home Improvement Center? The bad news is that he dropped the instructions in the fresh cement and proceeded from the picture on the box and had himself quite a mess. The good news is that he was adopted as a found-object outsider artist by a bunch of eurotrash. Then they dumped him. Sigh.
Consolation?
Good advice to use resources from elsewhere for schemo & layout. Drag about the Mojo hassles but I don't imagine you will be ready for the cabinet in the next coupla days, eh?
Best of luck! Hope this turns into a tone beast.
Posted: 30 May 2009 3:26 pm
by Dave Sharp
Hey Ben,
I'd contact Mojo. Sounds like they forgot to put the paper work in your package.
Quoting from their website: "Mojo kits are a collection of parts used to make an amplifier. We offer them with a bill of materials, schematic, wiring diagram, and transformer sheets."
Hope you enjoy your project--I've built two 5E3s and they're fun amps to build and play.
Posted: 31 May 2009 6:34 am
by Ben Jones
Hey Thanks Dave!
I will call them monday.
Lee, thats exactly what i am talking about and why i like to check the parts against a part list. i dont trust the parts pickers to send all the right stuff.
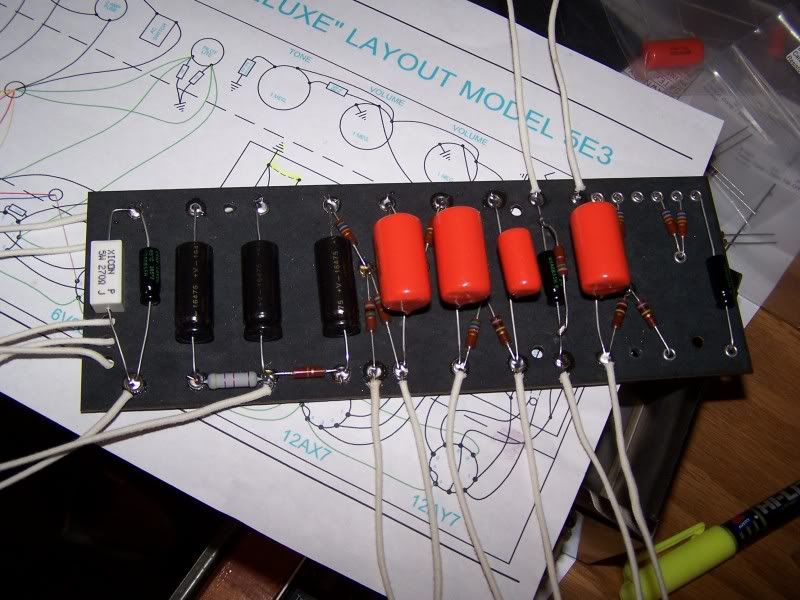
schematic I found online says 20% plus or minus values on all this stuff...wow...thats surprising to a novice like myself that there can be so much leeway in values.
Ive got the board figured out i think...but theres all these little nuts and bolts and none of em are labeled and of course they dont show those on a schematic or layout. some of em I can figure out...some hold down the transformers, the tube sockets, etc...but others??
I am also not understanding how the board will be mounted to the chassis. From pictures of other 5E3s it looks like there are maybe 2-3 screws in the board holding to the chassis? i see no holes in the chassis to accomodate this tho...guess i will figure it out.
Gonna take today and build a lightbulb limiter tester thingy, a cap draining alligator clip thingy, and go buy a DMM and test the vlaues of the parts they gave me. read some more....
tryingto post some pics of the kit but photobucket is nt cooperating.
thanks for the help all.
photos soon.
edit: heres my amp so far..haha..its quiet at least

Posted: 31 May 2009 2:04 pm
by Ivan Posa
I have built a kit amp from Mission. Their instructions were very clear and easy to follow. Lots of fun to build and sounded great.
Posted: 31 May 2009 6:36 pm
by John Gould
I've built two different MOJO kits and never had a problem with the parts and instructions showing up. I did have one with sort of a mix and match batch of caps for the power supply but everything worked fine and sounded good.
Sounds like a fluke to me, I've ordered lots of parts from them as well and always had good service.
Good luck and have fun with your build.
Posted: 1 Jun 2009 5:32 am
by Ben Jones
wow. I am surprised to hear others say mojo ships with instructions and a parts list. I will definetly call them today and see what they can do for me, thanks.
Yesterday i didnt get to touch the kit but i did do some homework. I went to a guitar show and played some fender tweeds. including this 5E3 wide panel tweed deluxe
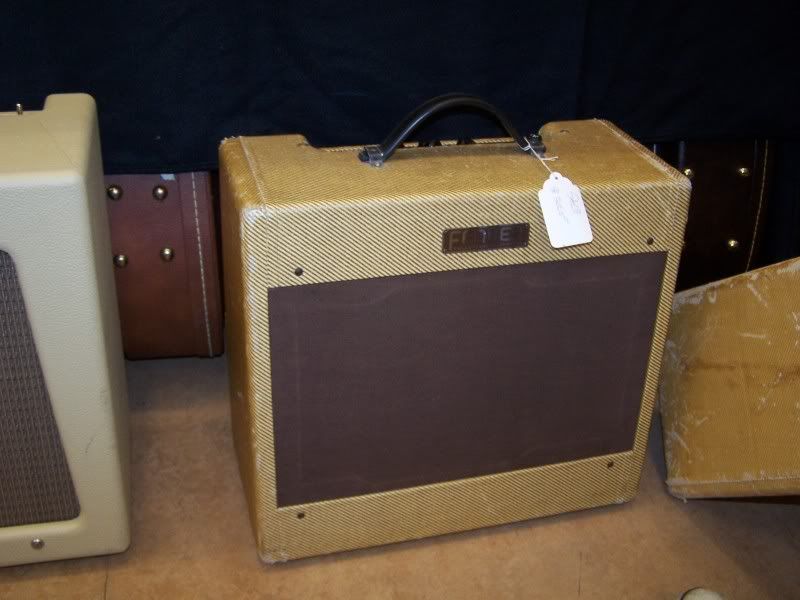
It sounded incredible, but unfortunately there was an even better sounding tweed tv front pro right next to it.
Posted: 1 Jun 2009 7:44 am
by Ben Jones
Called Mojo. Cab is a week away..they build these things as you order them apparently. That seems odd to me, but they know their business I guess.
These kits DO ship with a pretty good layout, a schematic and a bill of parts that has very helpful info on it. My documents were omitted in my shipment...mojo was kind enough to email me the documents and boy, that really helps me understand whats going on here!
tonight I will check the components against the bill of materials...and then check the resistor values.
Posted: 3 Jun 2009 1:22 pm
by Colin Mclean
Ben,
A couple of things--first, the wide panels were the 5b3, 5c3, and 5d3 circuits. You're building the narrow panel circuit. Won't sound too different from what you played, and I'm not sure exactly what the differences are but just thought I'd mention it.
Second, if you want some help building this amp, you should try this site (hopefully linking to other forums is okay):
http://www.thefenderforum.com/forum/index.php?s=
I've been hanging out there for a few years now and there are several very knowledgeable techs there. I've learned A LOT. The 5E3 is also a very popular amp with this crowd, so you'll fit right in.
BTW my handle "over there" is Boobtube21.
Congratulations on your kit, and best of luck with the build. It is a great sounding circuit.
Posted: 3 Jun 2009 1:58 pm
by Ben Jones
Hey thanks Colin! i will check that out for sure.
I found this great resource/forum. They have an amp builders forum and theres a 5E3 subforum.
 http://music-electronics-forum.com/home.php
I didnt realize the wide panels had different circuit numbers but of course that makes sense.
i checked the components against bill of materials last night and checked all resistor values with my new multimeter. will try and snap some photos of the components before I begin soldering this weekend.
Today i built a "lightbulb limiter" which I will use to test the amp safely when first firing it up. This is what i built and how its used. Maybe this is overkill I dont know, but i guess this way if I made a mistake nothing will get too fried hopefully.
http://www.geofex.com/Article_Folders/SPO_Test.htm
Posted: 3 Jun 2009 2:09 pm
by Colin Mclean
Well as I said good luck. And don't worry too much about fryin components, after all they are replaceable and it happens. Just don't fry yourself!
Posted: 3 Jun 2009 2:47 pm
by Ben Jones
that actually IS my only worry.
There seems to be alot of conflicting info on the best way to safely drain caps and work on an amp...
Is there a standard method? as i said, Ive found some conflicting ideas about how one should do this.
Posted: 3 Jun 2009 3:17 pm
by Colin Mclean
I use a homemade tool. It basically consists of a bunch of 1/2w 1 M-ohm resistors soldered together in parallel, with an alligator clip lead on one end, like this:

The clip lead is important, it allows you to drain the caps with one hand. I don't know if you're hip to this but a good practice when working on amps is to stick one hand hand in your pocket. Of course, since you're building your amp from scratch, your filter caps will have no voltage in them (unless someone at Mojo wants to play a funny joke on you). So you really don't need to worry about it until after you've plugged it in and fired it up.
Anyway, the way I do it is just clip the one end to the negative side of the filter cap, then touch the wire end to the positive side. Hold it there for about 20 seconds or so, then check with a voltmeter to be sure they are drained. Since they are all in parallel, you may only need to do this to one of them but check them all anyway--safety first. Remember, the voltages inside a tube amp can kill you.
Posted: 3 Jun 2009 3:24 pm
by Brick Spieth
I use the shotgun approach to draining caps. After just one good jolt, I don't care to repeat the experience. I pull the power chord while simultainiously strumming a guitar chord before working on an amp. I built a wire with a probe soldered to each end. I wired two large resistors in series in the middle of the chord and shrink wrapped them. you can then touch the neg end of the cap with one end and a chassis ground to the other. This will slowly drain power from the caps. Did I fail to mention that the amp be unplugged and switched off? I then put a meter to the cap to check for any voltage. I then use a screwdriver from the cap to ground just to make sure.
I have a friend who just does the last thing, but I'm not that fond of big sparks.
Posted: 3 Jun 2009 3:34 pm
by Ben Jones
Thanks Colin and Brick,
I found this on youtube, its similar but uses only one resistor. My friend who builds amps watched this video tho, and said poking around in there with that chopstick and alligator clip was a good way to short something out, so i diont know what to think.
opinions?
http://www.youtube.com/watch?v=Rg3-dZC5Fww
Posted: 3 Jun 2009 3:51 pm
by Colin Mclean
For one thing, only drain your caps with a screwdriver if you're ok with a spark show. That's not necessarily going to happen, but it's possible. Using a resistor or combination of resistors slows down the current drain, which lessens or negates the chance of sparks. For what it's worth, by all accounts strumming your guitar as you turn it off doesn' make any difference, and pulling the cord to turn it off is the same as turning it off at the switch.
Also, the clip lead this guy is using in the video might be ok, but I bought a bag of clip leads from a local electrical supply house, and nearly all of them needed to be re-stripped and crimped at the ends. And I can't abide by his saying, "you can doublecheck with your voltmeter if you care to". Just DOUBLECHECK ANYWAY. It takes 5 seconds and could save your life if your clip leads aren't up to snuff.
Posted: 3 Jun 2009 3:57 pm
by Colin Mclean
One more thing, re: the chopstick. That looks like a metal chopstick, not sure if there's anysuch thing, but if it is I don't think that's a very good idea. That's why I just use the wire.
Also, look at his hand, how close it gets to the chassis...kind of sketchy. Don't get lazy and rest your hand on the chassis, because...it's the ground. That would be the same, or similar enough to just draining the caps using your thumb and forefinger.
Oh, and I just realized this: that resistor is a little small. I'd go with something in the K-ohm range, with a good 1 or 2 watt rating.
Posted: 3 Jun 2009 4:39 pm
by Ben Jones
Thanks again Colin,
I think the chopstick in the video is wood and his idea is you dont have to get your flesh close to anything by doing it that way. I guess my friend thought that maybe the alligator clip was a bit big to be using as a probe and that it might short something if you inadvertantly hit the wrong component or whatever. This same friend suggested the strumming your guitar after turning the amp to standby until you hear no more sound as a method of draining the caps...but i thought that was maybe a bit cavalier. thus my confusion on the subject. so far ive asked two people about that video and they have both found problems with it...lol.
I have a fender reverb unit and a showman head. Last night I turned off the reverb unit but not the amp, and I could play for a good couple minutes before it finally faded out. To my novice mind this would indicate that the caps in the reverb unit (and they ARE big) are holding alot of juice, and playing the guitar somehow drains that juice..so i dont doubt that method, but it kinda seems like there must be a more thorough way, and i guess this alligator clip thingy or some variant is the answer. no way Im touching it with a screwdriver...I'd poop my pants if it sparked on me.

Definetly the first time i have to work on it after its been powered up, I will have my friend come over and just make sure i dont do anything stupid, but i gotta be able to do this on my own eventually, obviously.
Thanks for the help.
Posted: 3 Jun 2009 5:15 pm
by Ken Fox
Just attach a test lead to chassis and the other end to pin 1 or 6 of a preamp tube. Be sure the amp is unplugged and then both switches on. That will drain the caps safely thru the 100K plate load resistor.
No need for any special resistors and such, it's already built into each tube amp!
Posted: 9 Jun 2009 7:24 am
by Ben Jones
started the board last night. I must have made the wires coming off the biard too long, because i ran out of cloth covered wire. cabinet arrived yesterday.
Posted: 9 Jun 2009 12:24 pm
by Jim Newberry
Ben, looks great. I've been using my 5E3 as an experimenter (changing caps to see how the amp's voicing changes, etc). If you have any issues getting it started up or get stuck on something, drop me an email (jtnewberry at gmail dot com). Looks like we're neighbors.
Oh, and I can probably "loan" you some wire...