| Author |
Topic: Disaster!! |
Bent Romnes
From:
London,Ontario, Canada
|
 Posted 7 May 2009 12:37 pm
 |
|
I need help from woodworkers, re finishers and steel builders alike.
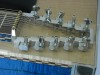
I had a mishap here. I had counter bored a hole for a front apron screw 1/4" too deep. I intended to use a shorter screw for that one hole but forgot, and the result was that the screw of course poked thru the top deck and not only made a hole but also cracked the wood around it.
In the pics you can see the hole and two of the cracks where the wood has lifted. Making a new e9th deck is not an option. A fix will have to do. So I am appealing to y'all if you have some ideas. By the way, the wood is hard maple and without much grain right there.
Never mind the black spot in front of the rectangle I drew around the problem area... It is just a burn from a router bit.

_________________
BenRom Pedal Steel Guitars
https://www.facebook.com/groups/212050572323614/ |
|
|
|
Connie Mack
From:
phoenicia, new york
|
Posted 7 May 2009 1:00 pm
|
|
if you dont mind how it looks too much, i would just work a bit of water into the hole and let it sit for about five minutes to swell it up. then work a bit of carpenters glue into that. put a piece of tape over that and clamp it if you can. if not, just let it sit overnight. any other kind of repair is going to be much more noticeable9unless you are a pro). you can blend in filler to the right shade after the first or second coat of finish.
_________________
82'sho-bud u-12, frankendekely u-12, bride of frankendekley u-12, a whole mess of other instruments...finger still messed up but getting better... |
|
|
|
Calvin Walley
From:
colorado city colorado, USA
|
Posted 7 May 2009 1:01 pm
|
|
dip some wood match sticks in Elmers carpenters glue put them in the hole , tap them in nice and tight let dry and sand smooth
_________________
proud parent of a sailor
Mullen SD-10 /nashville 400
gotta love a Mullen!!!
Guitars that i have owned in order are :
Mullen SD-10,Simmons SD-10,Mullen SD-10,Zum stage one,Carter starter,
Sho-Bud Mavrick |
|
|
|
Matthew Prouty
From:
Warsaw, Poland
|
Posted 7 May 2009 1:02 pm
|
|
I have repaired similar issues on cabinets and furniture. Here is what I would do:
1. Get some super fine saw dust that matches the wood.
2. Mix it with wood glue
3. Put it into a syringe and inject it into the hole
4. Align the pieces best you can
5. Cover with plastic wrap and clamp for the drying period
6. Remove clamp and plastic film
7. Sand and finish the area to match the rest of the wood.
If there is tell tale markings then you may need to shave the area down and patch laminate a piece of word on there. Either way it can be made almost invisible. |
|
|
|
Donny Hinson
From:
Glen Burnie, Md. U.S.A.
|
Posted 7 May 2009 1:40 pm
|
|
Matt gives good advice, but here's what I'd do first. The hole is very small and the chips (luckily) that are there will conceal most of the hole. I'd drip some wood glue on the area, and then push the pieces back into place (flush) with the bowl of a spoon (great tool, I use it all the time). After that dries, then you can do what Matt suggests (only from the back side) and partially fill the hole with sawdust and glue. Once that sets up, you can sand the top side lightly, and see what you've got. I'm betting it will be barely noticeable until you apply a finish to the body. How much it shows afterward will depend on what color the finish (stain) is.
Also, the next time you mess up a hole by drilling too deep or the wrong size, instead of doing the "quick 'n dirty but lazy" shorter/different screw idea, plug the hole with a glue-coated dowel and re-drill, or counterbore it again. 
If a job's worth doing, it's worth doing right!
Last edited by Donny Hinson on 7 May 2009 1:56 pm; edited 1 time in total |
|
|
|
Donny Hinson
From:
Glen Burnie, Md. U.S.A.
|
Posted 7 May 2009 1:46 pm
|
|
 |
|
|
|
Bent Romnes
From:
London,Ontario, Canada
|
Posted 7 May 2009 1:49 pm
|
|
Matt, Donny, that sounds like good advice. I forgot to mention that this part will be finished clear...Instrument lacquer over a vinyl sealer.
One problem I see is the wood glue/sawdust:1 - it dries to an ugly off-yellow. 2 - dried glue does not take a finish like the wood.
I will experiment with the vinyl sealer mixed with fine sawdust.
_________________
BenRom Pedal Steel Guitars
https://www.facebook.com/groups/212050572323614/ |
|
|
|
Connie Mack
From:
phoenicia, new york
|
Posted 7 May 2009 2:06 pm
|
|
once again, if you are concerned with how it will match up, do it AFTER your first or second coat of finish. if you dont, your filler might stain the area. the filler might look good until you put the next coat on, then look different. sometimes you might have to put on a couple of different shades of filler till you get it right. just keep these things in mind.
also, you'd be surprised how much a hole like that will close up if you soak it. learned the trick early on in my career to swell out elephant tracks(hammer marks in the wood). soaking it then lightly heating with an iron will swell it even more......
_________________
82'sho-bud u-12, frankendekely u-12, bride of frankendekley u-12, a whole mess of other instruments...finger still messed up but getting better... |
|
|
|
Donny Hinson
From:
Glen Burnie, Md. U.S.A.
|
Posted 7 May 2009 2:13 pm
|
|
| If you think a little "yellow" might mess things up, use Elmer's (White) Glue-All instead. I've even used it to repair and fill dings in cue-sticks, and it works fine, and retains a very whitish color. |
|
|
|
Danny Letz
From:
Old Glory,Texas, USA 79540
|
Posted 7 May 2009 3:33 pm
|
|
| I do not want to steal Bent's post, so please keep sending him your fixes, but I have also made a genuine brain crimp booboo. I drilled a 1/8 hole too deep from the bottom of a guitar and it came out between the necks near the selector switch (maybe a couple of inches to the right). It is a fairly clean hole in the formica. The bottom of the screw comes to 1/8 or 3/16 down in the top of the hole. (A barely booboo but still a booboo). I have offered to have the guitar re formiced. I have offered to buy the guitar, but my freind is to nice to punish me like I deserve. It is a wood gained formica. How is the best way to fix this? Other than shooting the perpitrater. I had a real hard time admitting I did this. (several sleepless nights) |
|
|
|
A. J. Schobert
From:
Cincinnati, Ohio,
|
Posted 7 May 2009 4:12 pm
|
|
| BR What ever you do decide to do I would think you will have to drill out the damaged area and glue in a repair, The pics are tough to make out, I can see the screw hole any chance of having inlay to cover it up (rope inlay)? Maybe a logo? |
|
|
|
Kevin Hatton
From:
Buffalo, N.Y.
|
Posted 7 May 2009 4:56 pm
|
|
| Throw the whole @##%^^&! guitar in the lake! (Just kidding). The saw dust thing works great. |
|
|
|
Alan Brookes
From:
Brummy living in Southern California
|
Posted 7 May 2009 5:02 pm
|
|
| My immediate thought is, as has been suggested, to find similar wood, cut some sawdust, mix it with adhesive and inject it from the back. If you do, make sure that you stick masking tape on the front first, so that the mixture doesn't run out of the front all over your guitar. |
|
|
|
Pat Comeau
From:
New Brunswick, Canada
|
Posted 7 May 2009 5:35 pm
|
|
Hi Bent,
Sorry for your little disaster  , i would do the same thing as the other guys said to take saw dust from the same kind of wood and i would mix it with the same lacquer that you're gonna use for finishing the cabinet, don't put glue cause it'll show yellow through the lacquer, once its filled and sanded it won't be that bad cause birdseyed maple already has all kind of imperfection in the woods and that's what make's it special so it'll probably look decent once it's all finish. , i would do the same thing as the other guys said to take saw dust from the same kind of wood and i would mix it with the same lacquer that you're gonna use for finishing the cabinet, don't put glue cause it'll show yellow through the lacquer, once its filled and sanded it won't be that bad cause birdseyed maple already has all kind of imperfection in the woods and that's what make's it special so it'll probably look decent once it's all finish. 
good luck my friend.
_________________
Comeau SD10 4x5, Comeau S10 3x5, Peavey Session 500,Fender Telecaster,Fender Stratocaster, Fender Precision,1978 Ovation Viper electric. Alvarez 4 strings Violin electric.
Click the links to listen to my Comeau's Pedal Steel Guitars.
http://www.youtube.com/watch?v=hIYiaomZx3Q
http://www.youtube.com/watch?v=P2GhZTN_yXI&feature=related
http://www.youtube.com/watch?v=TvDTw2zNriI |
|
|
|
Jerry Roller
From:
Van Buren, Arkansas USA
|
Posted 7 May 2009 6:23 pm
|
|
If you have a piece of this wood left over that has some knots in it similiar to those on the deck of your project you could carefully whittle a knot out, drop some glue in the hole, place the knot it it and clamp it down, then fill the cracks with glue and sanding dust, let dry good and block sand. Sounds just wild enough to work. I would be more concerned with the burn.
Jerry |
|
|
|
Bent Romnes
From:
London,Ontario, Canada
|
Posted 7 May 2009 7:45 pm
|
|
Pat and Jerry, Thanks for suggestions but I guess I failed to mention that this is not the birdseye maple cabinet but the straight hard maple...not much figuring and certainly a far cry from the "imperfections" in the birdseye. And right at the damage, the wood is quite white and grain-free!
What I did was glue the cracks and clamp overnight. Then there should be a hole left. I will experiment with glue/dust, and sealer/dust on scraps and see what works best.
I will also experiment with a suggestion I got in an email: Drill out the hole to a size where I can cut a plug and glue it in there.That way I can get the grain direction. If I can live with a nearly unnoticable circle, that's what I'll do.
_________________
BenRom Pedal Steel Guitars
https://www.facebook.com/groups/212050572323614/ |
|
|
|
Bent Romnes
From:
London,Ontario, Canada
|
Posted 7 May 2009 7:47 pm
|
|
| Jerry Roller wrote: |
I would be more concerned with the burn.
Jerry |
Jerry, I got rid of the burn..sanding and some careful scraping.
_________________
BenRom Pedal Steel Guitars
https://www.facebook.com/groups/212050572323614/ |
|
|
|
Jerry Roller
From:
Van Buren, Arkansas USA
|
Posted 7 May 2009 7:58 pm
|
|
OK Bent, one more idea. You could route a groove end to end thru the damaged area, go to the other deck and route a groove the same distance from the edge so they would match, then choose a contrasting wood and make two inlay strips. Inlay them and sand them down flush. Check out your overall project and you might come up with an inlay that would match something else such as necks and might even come up with something very nice.
Jerry |
|
|
|
Ulric Utsi-Åhlin
From:
Sweden
|
Posted 8 May 2009 12:14 am
|
|
Assuming the wood chips are still there,most pro
repair men/women would use controlled amounts of
cyano(this speeds the process up,and the customer
knows what we charge per hour...) ; if it´s a
natural finish,there may be need for a trompe lóeill
touch up(small artist´s brushes and/or airbrush);
this is absolutely necessary if You choose the
wood powder/glue method,since that mixture always
comes on many shades darker than the wood used ; a
word of caution,though...the cyano method is risky,
one small mishap and the finish is ruined,so Franklin´s Titebond would be the recommendation.
McUtsi |
|
|
|
Martin Weenick
From:
Lecanto, FL, USA
|
Posted 8 May 2009 3:23 am Hole
|
|
Bent, maybe a small plug cutter to make a dowel of the same piece of scrap and then drill the right size hole and insert with clear glue being sure the grain in the dowel is running the same way as the deck. Just a thought , I have not tried that way. Martin.
_________________
Several custom steels. NV-112 Boss DD-7 |
|
|
|
Ken Metcalf
From:
San Antonio Texas USA
|
Posted 8 May 2009 4:20 am
|
|
It has been my experience on new wood, gluing or over gluing is a problem as it seals the wood and will prevent the stain from penetrating uniformly. The water trick with some matched filler that accepts stain is the way to go.
I would also advise a test run on a scrap board with stain and finish. It is different than a previously finished surface which is already sealed.
_________________
MSA 12 String E9th/B6th Universal.
Little Walter PF-89.
Bunch of stomp boxes |
|
|
|
Bent Romnes
From:
London,Ontario, Canada
|
Posted 8 May 2009 6:20 am
|
|
Ulric, sorry but I read your input a bit late. I was lucky to have almost all the pieces and glued them in with yellow glue. Sanding this AM improved the area about 70%.I tried a wee amount of powder/sealer mix in the small hole and it turned out as you said...many shades darker than the original wood. But the area is so tiny...about 1X2 mm, that I am going to do a fine sanding and brush on a coat of sealer around the area to see what the end result will look like. If I can't live with that, I might try what Martin W and the emailer suggested...drill out a 3/8" hole and put a taper fit plug in, with white or clear glue.
Jerry R, your suggestion was right on but the damage is in the wrong location for inlay etc
In any event, y'all wish me luck! And thanks so far for all the great suggestions!
_________________
BenRom Pedal Steel Guitars
https://www.facebook.com/groups/212050572323614/ |
|
|
|
Bobby Burns
From:
Tennessee, USA
|
Posted 8 May 2009 6:34 am
|
|
Sorry about your problem.
In the violin repair world, invisible repairs are a daily thing. If the hole was made from the screw pushing out, most of the fibers will still be there. Don't drill, sand, fill or color anything, until all of the fiber can be put back in place.
I would wet the area to soften and swell the fibers. After a short soak, a hot iron and a wet cloth, applied just as if you were ironing it, will do wonders to flatten the area, and put the fibers back in place. This will also swell the fibers to fill any voids so that very little if any patching will be needed. Hot hide glue is the only glue to use that will make this repair truly invisible with a clear finish. Apply the thinned hide glue liberally, soak the whole area. It may help to do the ironing again, while the glue is still wet. This will make a mess, but the great thing about hide glue, is that it can all be cleaned up later, it doesn't stain anything, and if you mess it up the first time, just heat again and start all over. if you do this, after you sand it out, you will be the only one who knows there was ever a problem. Nothing drilled, pegged, filled, or hidden by dark finish. |
|
|
|
Connie Mack
From:
phoenicia, new york
|
Posted 8 May 2009 6:40 am
|
|
listen to bobby....
EDIT...oops, didn't realized you alredy went and done it....
_________________
82'sho-bud u-12, frankendekely u-12, bride of frankendekley u-12, a whole mess of other instruments...finger still messed up but getting better...
Last edited by Connie Mack on 8 May 2009 6:41 am; edited 1 time in total |
|
|
|
Bobby Burns
From:
Tennessee, USA
|
Posted 8 May 2009 6:41 am
|
|
| Bent, when I read your first post, I responded right then. I now see that he had already patched it. I am sorry that I did not read it sooner. I think that I could have help this repair disappear. I have been watching your projects, and look forward too seeing the finished instruments. I'm sure they will be beautiful. I'm sure that no one will see the flaw, until you show it to them. |
|
|
|