Page 83 of 123
Posted: 10 Jul 2009 5:25 am
by Jim Peters
Jim S, I am a former ZB owner and poster on this thread because of the horror you are about to experience. Best of luck, JP

Posted: 10 Jul 2009 9:09 am
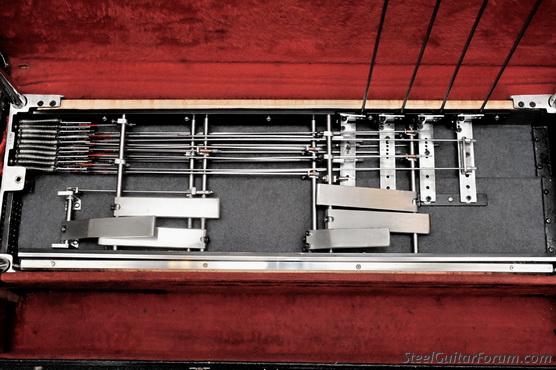
by Bob Adams
Jim Trust this helps....


For the record the picture is of Frank's D10 in Corfu
taken the other week the diagram is of that set up which works perfectly
best regards..... Bob
Posted: 10 Jul 2009 11:56 am
by Jim Sliff
Hmmmm...well, that one will have me scratching my head for a while. It's certainly NOT the assumed center pickup selector switch and a 3-way for each pickup. The diagram...and picture...are both so unusual that I'm going to need to draw up a schematic to figure out what's actually happening.
In a way I'm glad it's different, and not as vanilla" as I thought. I use Red Rhodes' Velvet Hammers in my Teles, and his crazy wiring harness and "boost coil" pickup gives you the highest gain at about 75% on the volume control....then it progressively shorts one coil out, with a sort of variable out-of-phase tone.
I did notice that how it's wired now (which may be correct) NO switch position sounds like any other "normal" steel except maybe my GFI - far more mids and...ahem...rounded lower-body objects...than others - falls right in line with my other guitars and FAR away from the MSA's and Shobuds I went through (thankfully!).
Still looking for info regarding rods and turnbuckles...plus any positive/negative comments regarding the current E9 copedent. Thanks!
Posted: 10 Jul 2009 11:29 pm
by Paul Frank Bloomfield
Further to Bob's excellent diagram of the wiring
of my ZB, the switch in the middle is not a pickup selector but a simple on/off switch for both.
Hope this is useful to you.
All the best
Frank. Corfu
Posted: 11 Jul 2009 6:59 am
by Jim Sliff
Yep, I thought the wiring was thoroughly cornfungled - but after I read the descriptions and sketched out a schematic based on the wiring diagram I was lmao...it looks like one of my crazy wiring schemes (using bizarre pickups); most of my weird ideas come from hanging out at an infamous little place know as Red's Royal Amplifier Service in the 70's. Some big guy who owned the joint (who through some odd coincidence used to sit in with our band on steel when we played the Palomino - he seemed to be there a lot...) taught me how to wreak havoc on Teles and Strats - and it transfers over VERY well to steel.
I swear if Zane Beck designed the pickups and wiring he HAD to have been influenced by The Man.
http://www.velvethammerpickups.com/
Posted: 11 Jul 2009 12:57 pm
by Jim Sliff
Today I got the E9 neck working - not refined, but working.
It only took 6 hours

to fix two pulls that had slipped out of the changer, move two more that were in the wrong place (the third pedal was all fouled), work up a replacement for the cotter pin on one of the E lowers, as the "hole" in the pull-gadget attached to the lever crossrod that holds a cotter pin is no longer a hole - apparently it's become a "slot". Another part on my list of things to replace.
Stuff obviously needing work:
1. Replacing the E lower rod with the busted hole.
2. Remove ALL the turnbuckles bit by bit, clean all the garbage out of the threads and tighten them - everything has too much slack and the turnbuckles are either REALLY tough to turn or frozen).
3. The wiring is different, but fully functional except for the center switch - which I just found out is not wired at all! One of the pickups has the coil-select switch set with the wires seemingly reversed, but since both necks work fine I'll leave it alone. Someone mentioned a bypass of the volume and tone controls - WHAT volume and tone controls?
4. Make longer pedal rods - every single one falls out if you look at it wrong as the "hooks" are almost flat, and they are too short for me (it's really tough to use the knee levers as I'm hitting them right near the pivot point - I'm 6'4").
Once those are done I'll concentrate on the other neck - I've played C6 before and it's fun but not something I'd use regularly (I do use it on lapsteel though) - I'm going to follow through with re-configuring it similarly to my GFI Ultra; B6 like my enders but with just the most essential changes (most essential to me, that is!). The 8-string's 4,5 and 6 pedals will be left out, and I'l probably have to sacrifice the K as well. But it looks like it won't be really that bad (just time-consuming) setting up the 1,2,3,7&8 pedals and the LK of the 8-string copedent.
I like the pickups a lot - the 3 coil design is tremendous and with my Steeldriver for volume and tone controls I'll be able to get pretty decent, fat tone out of it.
Oddly, I thought the pedals would be more like my GFI and have a shorter throw than the Fenders - but they all have longer travel.
Still have not had any luck with changer rod or turnbuckle sources. I may have to figure out how to make them myself - the turnbuckle won't be too tough, but the odd spoke-ended rods I'm still pondering. If nobody responds with sources I'll have my machinist look at them.
Posted: 11 Jul 2009 3:31 pm
by Jim Peters
JS, The hardest part of ZB adjustment for most seems to be getting the pulls timed right. That is, those allen heads have to hit the wood at exactly the same time, or the pedals get horribly stiff, Sliff. (sorry!)
If they're set right, it is a beautiful thing, if not, it can be a real challenge. Best luck with yours, mine's in California somewhere, thank God! JP
Posted: 11 Jul 2009 4:18 pm
by Brendan Mitchell
Jim
I was under the impression that the slider switch in the middle of the selector switches was on/of control for the tone and volume located on the endplate .
Posted: 11 Jul 2009 5:10 pm
by Jim Sliff
hmm - well Brendan, maybe there were different options? Because this one has the switch, but not wired up (solder residue tells me it WAS wired at one time) and there are no volume or tone controls. The endplate has only the hex tuners and spring adjustment screws.
These pedal rods are driving me nuts by slipping out every time something bumps the guitar - I'm going to try to bend the tips down into a little bit of a "hook" - if I bust one it's no big deal since I'll soon making longer ones anyway.
Posted: 11 Jul 2009 10:40 pm
by richard burton
Jim,
Make sure that the hooks go between the crank and the body

Posted: 12 Jul 2009 2:33 am
by Bob Adams
The two outer switches have always been the pick up coil length selectors, single, double and triple. The centre switch would normally have been the E9th to C6th neck switch, with tone and volume on the changer end plate but most folks don’t use them, Frank’s was, as he says a simple on/off switch in the middle (no tone/volume on the end) (I should have added this to the diagram sorry)
Posted: 12 Jul 2009 8:54 am
by Jim Sliff
Bob - interestingly, I got two different diagrams and a third description; one had the middle DPST as a neck selector (front/back), the other has the left 3-way switch as the neck selector (front, both, back); the third description had the middle switch as a volume/tone control bypass.
There are also two people who have mentioned volume and tone controls, so I can only hazard a guesses that Zane and Tom made them a bit differently or one or the other offered controls as an option.
Richard - DOH! Sometimes you just can't see the forest for the trees. I've been so immersed in trying to wrestle with frozen turnbuckles and weird pull settings (those nasty little spoke/rods to the changer have to be the invention of someone wth a slightly sadistic side!

) that reversing the rod position never occurred to me.
Whoops - just went over and tried to switch them and they don't fit that way. I'd have to loosen each lever to be able to fit them from that side, although there are scrapes in the black paint indicating something has been rubbing behind each lever (and the tips don't reach that far). I estimate I'd need about 3/16" more distance from body to lever to make them fit with that orientation.
Yet I'm thinking that with some of the other mechanical acid trips on this great sounding monster maybe it was
designed not to be put in the case very often - and that I SHOULD loosen the levers.
Oh, lordy, did these COME with an unlimited Valium prescription?

Posted: 12 Jul 2009 12:46 pm
by Jim Sliff
Took some photos of "problems areas" and "future mod question items":
This is the 4th string lower rod connection - the hole in the rod is no longer a hole - it's a "notch". The piece of wire holding it in place is about as secure as bubble gum, so I need to replace this one asap - that's why I'm trying to find out exactly what these rods are.

i.e - it *looks* like an overweight bike spoke. Not to mention that having big hands is a real disadvantage trying to get these suckers in place...and staying there while the turnbuckles are tightened!

Here's my pedal rod issue - besides the obvious goofy nut arrangement on one lever that I need to remove and see if there's a problem, the tips of the rods are nearly flat and easily fall out. However, the "reverse" position Richard suggested, as you sort of see (sorry about the photo quality, I knocked these out quick) would require loosening...or removing...the lever to install or remove a rod. That just not seem logical. All the rods appear to be original as they have stamped-in numbers on them.

A little hard to see - but both fretboards have a "hump" in the center. What's the recommended reattachment method? I did note in an old post something about these having a fouled-up scale on the upper frets, but I'm not overly bothered as I don't usually play in the stratosphere anyway - I rarely get above the 15th fret as I play quite differently.

This Chinese fire drill is the C6 side of the E levers. What I'd like to do is use one or both for additional pulls on the C6 neck (which will be a B6 neck, but mechanically it's not relevant). I'm assuming it's OK to use the holes in the RKR shaft to attach additional rods; what about drilling the RKL rod? Because of the pedal positions I'll be using these will be the two best-positioned; the left knee levers will be ankle-busters if used on this neck.
A lot of that extra tree stuff will likely be removed once I have rod source(s). My normal changes are much simpler.

Just for the heck of it, the serial number:

Thanks for the tips. I'll keep digging for what's adapted from other "machines" and what has to be made....
Posted: 12 Jul 2009 1:21 pm
by Larry Chung
Hi Jim:
As I mentioned in my email to you - you want to think carefully about where everything should go, how it might work, and be patient in your repairs. ZBs are not the easiest to work on, granted, but, if you think through the mechanics, it does make sense, which is the reason it all works to begin with...
Case in point: Pedal rods - you have them backwards, they should slip in-between the front panel of the guitar and the pedal rod attachment. Otherwise, they will fall out. If you look at the space in question, you'll see that there's an area that keeps the rod in place, you just have to carefully slip the pedal rod and rotate from a right angle to get it into the hole.
The tips of the rods are flat precisely because you can only insert them from one particular place - start with the length of the pedal rod lying across the width of the guitar and the bent rod end in between the front of the guitar and the rod attachment (hole), lift the back of the rod up (from the back of the guitar), and, while you're doing that, just slip the flat tip of the pedal rod into the hole, with the elbow of the rod now between the hole and the front of the guitar. Should work like a charm.
Nice ZB, I'd say early/mid-70s, Pheonix-built. Looks like most all of it is original, too, including the tree-like pulls. They do work, but need to be balanced properly, which takes some practice and experimentation, too.
Good luck, remember, think it through, explore the options, and be patient with yourself. And get some sleep! (:
ZBest,
LC
Posted: 12 Jul 2009 4:30 pm
by Jim Sliff
start with the length of the pedal rod lying across the width of the guitar and the bent rod end in between the front of the guitar and the rod attachment (hole), lift the back of the rod up (from the back of the guitar),
I assume that means from left to right? Not quite sure, but I did get them in (#2 and #8 were a bit balky and also tough to remove, so those levers I'm going to need to look at more closely). But the only way to get them in was (with the guitar upright - my back's done from lifting the thing 30 times yesterday...) hold the rod parallel to the floor sticking straight out towards the back (seat side), slip the tip upwards into the space and then swing the rod straight down, making the tip rotate forwards. Larry, maybe you were describing the same thing, but as if the guitar was in the case?
I managed to dig up some 10-32 couplers and bought some corresponding bolts (to be beheaded) and lock nuts to put together my own extension kit - it'll allow me to mess with various heights, find the right one for me and THEN make new rods to the appropriate length.[/list]
Posted: 12 Jul 2009 5:01 pm
by Duncan Hodge
Welcome to the wonderful world of ZBs Jim. Once you get it set up just right you'll never need to do it again. Also, if I find any spare valium, or ativan, laying around, and in my job that could be a distinct possibility, I'll send you some. Hang in there brother...it'll be worth it.
Duncan
Posted: 12 Jul 2009 5:50 pm
by Bob Adams
Jim in your first picture some rod ends were just heated and flared, others had little holes in and wire through them, the rods were mild steel then, second pic is hazy but looks like your fourth string raise it is a little flared end and screwed rod (the same as the ones attached to the changer) silver soldered onto the pull rod, the screwed rod being the one that goes through the middle position on the end plate to give you the half raise.
The attached drawing was from one of the guys here on the forum, if it is unclear I’ll try and get you another picture.

When they are tidied up they are the muts nuts! This picture is my SD10
ZB Jungle.
Posted: 12 Jul 2009 7:30 pm
by Jerry Kline
Thank the Creator for Jones, Knowles and Hatton !!!
Posted: 12 Jul 2009 8:49 pm
by Jim Sliff
Ah, more interesting every minute.
When I said the E9 neck was working I was a bit premature - I switched out the missing rod and reattached on of the knee lever rods - then it seemed to be playing OK, but obviously in need of a lot of fine-tuning, which I expected.
But there are a couple of new quandaries:
1. Whoever had this thing last hooked up the C lever to the 5th and 6th strings, with one of the pull holes having two of the spoke-like ends in the same place, one behind the other. Obviously I'll have to move all that stuff and put those rod ends in the right place - not my current favorite past time as I can't find any method that consistently will turn the spoke-end the right direction and KEEP it there while squeezing it between fingers (some fingers seem slightly closer together than others, and the rod ends have to be forced/slid along the finger to get to the hole - about a 100-1 shot.
2. My F lever is nothing like the picture - in fact it's exactly opposite, with the rod running straight to the lower raise tuner and the soldered part going UP and in the first finger hole. This is something that had to be intentionally done, so there must be at least a couple of different ways this lever is hooked up (there's no way you could hook that lever with the soldered part any other way). But now I'm wondering if the C pedal screwup is because whoever had this thing could not get the existing C pedal rod to reach the back hole. I suppose I won't know until I try to move it. Here's an edited pic to show what I have:

Posted: 13 Jul 2009 12:41 am
by Bob Adams
Revised drawing won.t work Jim because the lever needs to be in the back keyhole! as it has very little travel to raise the F lever where your C pedal has a long pull. grab a pair of scissors, open and shut them and imagine your rod being attached at the end or the middle of them and judge the pull distance (same scenario)
Posted: 13 Jul 2009 2:16 am
by Bob Adams
Jim your F lever hook up wants to look like this ( or close!) note the z bend in it to pass the finger and locate the middle whole in the end plate

and definitely 4 & 5 for not 5 & 6 as was done
Posted: 13 Jul 2009 4:47 am
by Jim Sliff
and defo 4 & 5 for not 5 & 6 as was done
Bob - I'm not quite sure what that meant (defo?) but I assume it has something to do with moving the pulls to 4&5, which I need to do.
As far as your second photo - of the finger and rods- I'm confused (which ain't too surprising at the moment...hehehe). Don't you have those laid out to fit the lower finger, with the raise above it empty?
I think I understand the idea based on how mine is apparently hooked up - that the shape of the rod shown in my edited drawing would work *if* the little vertical "spoke" (with the arrow pointing to it) was in the
back hole instead of the front.
It seems to me that the existing rod would be way too long from the vertical section to the endplate for it to fit in the back hole, though - like the second raise tuner would end up sticking out a half inch. I also wonder if there's enough length in the two rod sections at the turnbuckle to extend the back rod far enough to fit in the back hole.
I guess I won't actually know until I take that whole assembly apart, which is apparently going to have to happen.
The weirdly interesting part is that where the C pedal rod is in the same hole as the A pedal rod, with the spoke-end snugged up against each other, both in the back hole, both raises work - I guess that makes sense since the pull lengths are the same, though.
But it doesn't makes any sense to me why there would be any difference in using the back or front hole for a shorter pull - either way the short-pull rod is going to just slide in the slot when the longer pull is made, and visa-versa; the longer pull spoke will slide in its slot when the shorter pull is done - the slots appear to be nominally different in length - not enough to cause the short-pull rod to pop out of the hole - so does it really matter which one it slides in? There does not appear to be any mechanical limitation as far as the travel of either rod in either hole.
If someone can decode what I just wrote and explain what I said - a million thanks!

Next - since I have to move a bunch of stuff still on the E9 changer, is there any trick method for getting the spokes IN the holes and secured while the turnbuckle is tightened? Fingers don't fit in there, and with needlenose pliers the width of the plier jaws with a rod between them (even the extremely narrow type, which I have) is too wide to fit between finger - you have to really force your way in and bend the fingers apart - which 1) isn't easy, and 2) seems like a REALLY bad idea.
I'm guessing that like I missed the unusual angle to install the pedal rods, there may be some angle or direction I'm missing here.
Thanks!
Edited to add - does anyone know what thread the changer rods and turnbuckles have? We tried fitting one last week into holes in a multi-hole thread checking plate and it fit none of the usual suspects (6-32, 8-32 etc). It's possible the one I was checking was banged up, as it had a little trouble fitting the turnbuckle - usually even something a little messed up at the end will still thread into the plate somewhere..
Posted: 13 Jul 2009 5:11 am
by Bob Adams
My deepest apologies (confusing even further eh) did that in too big a hurry this morning, yes I have shown them going into the lower rather than raise…twit! …. Defo = definitely ( I've taken that pic back off for now!)
Remember if you are going to re-fit those adjustable hexs on the pull rods that they thread to the centre in opposing hands ie. Left and right threaded in order to tighten them up, try finding a left hand taps… not easy over here!!
Posted: 13 Jul 2009 10:13 am
by richard burton
If I remember correctly, I had the same trouble as Jim, trying to hold the bike spoke in position whilst also trying to turn the turnbuckle.
I ended up connecting the rod up to its approximate length on the workbench, and then inserted the whole assembly into the steel.
It helped to slacken the return springs right off, which made rod insertion easier.
I don't think it matters which slot the F rod goes in, although it makes sense for the F# rod to go in the hole furthest from the changer endplate, so that it can't foul on the F rod
I notice that the cranks which the pedal rods hook to are held in place by an allen bolt pivot, all except one, which appears to be a stud with two nuts on it.
When you dismantle the guitar, Jim, make sure that you remove the pivot assembly plate completely, (as this can be a problem area on ZB's), and check that each allen bolt pivot is tight, and cannot come undone, yet at the same time ensure that the pivot plates are fairly loose, so that there can't be any binding.
Posted: 13 Jul 2009 10:36 am
by richard burton
I've just measured the turnbuckle threads, they appear to be 1/8" diameter with 40 teeth per inch left and right hand.
The motorbike spoke that hooks onto the changer is right hand thread.
Here's a handy hint for determining if a thread is right or left hand:
Hold the rod up to the light, and if the thread spiral goes up to the left, it's a left-hand thread
