
I have been contemplating writing this article for some time. Unfortunately my chronic, unmedicated ADHD has prevented me from doing so, until now.
The modern pedal steel guitar is a marvel of technology. The mechanics are also as simple to understand, as they are difficult to effectively tune, and keep in tune. Many of you have struggled for years trying to settle on an effective way to tune our guitars, and KEEP them in tune. Now with the advent of “SPLIT TUNERS” we throw another variable into the mix. On top of that, many players go one step further and opt for compensator rods in order to manage ‘CABINET DROP”. Cabinet drop is present in ALL pedal steel guitars, unless a mechanism to compensate for the flex of the guitars top, is incorporated. So before we get started into this discussion, id like to point out a few things that we need to take into consideration. The following unavoidable variables will ALWAYS affect how well a Steel Guitar will hold its tuning. Temperature, Humidity, Quality/Age of the strings, Heat Transference, Stage Lights, Sunlight, and the overall condition and quality, of your changer, and tuning machines
Lets assume that we have tuned our guitar by ear and a pleasing consonance has been reached across the fingerboard, The instrument was tuned in a room with constant humidity, and temperature. Regardless of whether we tuned with an electronic tuner or by ear, as long as the temp and humidity remain constant, and we don’t touch it, the guitar should remain in tune…As soon as you begin transferring energy in the form of heat, from your hands, this balance will begin to deteriorate. To test this theory, tune a string, and grasp it at the changer end with your index finger and thumb. Slide your fingers the length of the string with moderate pressure,and immediately check your tuner. The string will be flat several cents until the heat dissipates, then will return to pitch in a few seconds. As the strings are stretched and released, there is another transference as well. When the string is stretched, the minute amount of energy used to pull the string will result in a slight temperature change also…and we are doing this constantly. Although at this point the fluctuations are very minor, we are going to compound them as we progress through a composition. All stringed instruments, no matter what they are composed of, will change baseline tuning directly with ambient temperature. When the guitar body, its rods, the changer heat up, the guitar will go sharp, and the pulls will be sharp as well. The same is true for decreases, which will cause the guitar tuning to go flat. The guitar will literally expand, and contract. Lets keep all of this in mind as we progress, and move on.
TEMPERMENT:
Over the centuries countless means of incorporating “COMPENSATION” into musical instruments has been evolving. If any of you have taken time to do the research, you will find that it actually dates to the Baroque era. Many of us were blessed, or cursed with either PERFECT, or RELATIVE pitch. In extreme cases, a fist full of dissonant garbage can be played, and a finely tuned eardrum can pick out EVERY NOTE without fail. Most of us however have relative pitch, and I believe it becomes more acute, even as our actual audible perception levels decrease. Lets begin with the simple concept of EQUAL TEMPERMENT. To put it into laymen’s terms: Concert pitch, A 440, means that this A Note vibrates at 440 cycles per second, and the next higher octave A at …880 cycles. 440/12= 36.6666667 cycles per ½ step. Therefore each half step would increase its vibration rate by this multiplier. Now with this formula this is what we get…PERFECT 5ths, PERECT 4ths….etc etc…We also get…Yep.. IMPERFECT MAJOR thirds. The best analogy for this is the primary G chord on your guitar, where you just CANNOT get the B string to sound right…Its just a law of nature. THE WHOLE+WHOLE interval is the Achilles heel of the stringed instrument world. It’s a shame we cannot just hire an exterminator to get rid of it…Instead…we have to compensate…Herein lies the caveat…once you begin compensating, you cant stop, because every time you redefine one interval, you CHANGE ANOTHER….ie: if E and B are in tune, and you change the major third G#, then G# is no longer a perfect 5th from D#...and the cycle begins…Eventually we have to find a common ground and just accept that this is an imperfect instrument, period. You may have heard that piano tuners tune each higher octave above Middle C 2 cents sharper than the previous. 2 Cents is about all the average ear can discern, and this was DEEMED to be “Acceptable”. As long as your playing piano by yourself, even that seems unreasonable…UNLESS YOU PLAY WITH ANOTHER STRINGED INSTRUMENT…One glance through Petersons website, and a scroll through the menu, reveals a plethora of “Tempered Tunings”, all arrived at because of imperfect intervals. Since then a never ending stream of "Sweetened" tunings have evolved in order to make sure that stringed instruments could effectively blend with woodwinds, horns, and everything else in the multi-instrument orchestral setting. We as steel players have adopted Newman's tuning, as it gave us all some relief. I purchased Emmons harmonic tune-up tape in the 80s as well..At this juncture I'm really sitting on a fence with the whole picture, and incorporating some of each method. Your guitar, and how you tune it is entirely up to you of course. With the advent of the hyper sensitive Peterson tuners, we can now tune our guitars much easier, but it also makes the imperfections readily discernible too. In the end you have got to trust your ear, just as in the clouds, a pilot must rely on the gauges to know he's upright. Sometimes too much input results in confusion.
In the 60s the Tune-o-matic bridge came of age, allowing guitarists to actually fine tune the octave/12th fret interval. The only variable there was the distance you had to press the string to GET it fretted…and if your neck was bowed, well that all goes to hell too…We don’t have the luxury of having a tunable bridge, some of us press down harder on our strings than others. Some of us don’t hit the fret right on target either. So if you thought that the items listed in the first paragraph were all you had to deal with..THINK AGAIN!.If you want an eye-opening experience…Tune your guitar with an electronic tuner…then place your bar PRECISELY at fret one and look at the notes in an F MAJOR chord….OUCH!!!...No wonder Miami My Amy is such a difficult piece! Now that my rambling spewing of total frustration has deterred you from playing steel at ALL…lets get into, Changers, Pedal Stops, and the basic mechanics of stretching wire effectively..This article was not intended to a be my sermon on HOW to tune your guitar..its just been done too many times, and is subjective to the extreme..Instead, its meant to just give you a little extra ammo with which to wage war with. But before we do that...we clean our rifle right?...Making sure our guitar can be "all it can be" should be the first step in tuning. Ive seen SO many great guitars that were unplayable, or tunable simply because of a minor adjustment. Many of you own guitars that are second hand, and have undergone changes in the undercarriage over the years. Although your guitar may be comfortable and function, we may be able to improve it...tighten it up, and make it more stable..
TEARDOWN
Many of you are afraid to tackle rearranging the undercarriage for fear of turning your guitar into a gimp. Hopefully I can instill a little confidence in you with this manifesto... When I tear down a guitar there are just a few things I want to be sure of, before I start to reconstruct the rodding puzzle. If you just pull ALL OF the rods out of your guitar (ALL PULL ONLY)…you still have a working steel guitar. There are 2 PRIMARY things that must be verified. 1: The changer fingers are resting on the stop plate, the raise and lower fingers pivot properly, and the crossrods rotation, and pedal movements are not bound, or hindered by ANYTHING. The tuners are tight, the endplate screws are tight…Anything which hinders the free movement in your guitar should be eliminated, or at the VERY least minimized. Im going to use the Mullen guitar (of course) as a model!
The changer has 5 holes, the bottom3 being raises, and the top 2 being lowers. (RP, PRE RP), and the bellcrank has 5 holes. When the guitar is upside down, we will count from the bottom up in all examples..ie: Bellcrank position 1 will be closest to the crosshaft (shortest throw) and 5 will be on top,(longest throw). The same goes for the changer…the hole in the changer closest to the center of rotation, on the changer axle will result in a SHORTER throw, than hole 3….In order to make this as simple as possible we need to have 1 constant from which to measure throws. This will be the Pedal/Lever stop. ALL PEDALS AND LEVERS HAVE AN ADJUSTBLE STOP, and a FIXED STOP. With the adjustable stop we increase or decrease how far a pedal or lever can physically move. By changing the position of the rod in the bellcrank, we can change how far a given lever/pedal will effectively pull the changer. Before we go any further we need to understand the basic physics of raising or lowering a string, or group of strings in pitch.
The smaller diameter the string is, the more tension is required to tune it up to pitch, and the distance the changer will have to move will increase as well.. Example: you will have to pull string 3 much further than you will have to pull string 6 in order to get them BOTH to the pitch of A, ½ step up. Therefore, you will use string 3 to set the B pedal travel, not 6. Your 3rd and 6th string will NOT pull in tune, in time together. They can REACH pitch at the same time only. Ive had people argue with me about this over the years…and im here to tell you…Since the ratios of the different gauge strings are vastly different…IT ISNT GOING TO HAPPEN.
So lets go through the steps for putting a raise on a lever, for strings 4 and 8, Es to F.
Lets begin with a string usually somewhere around a .014 gauge plain string. Since we are only going to raise it ½ step, there’s no need to climb too high on the bellcrank, nor to occupy the 3rd raise in the changer. We will need the whole tone pull on pedal C to occupy this position in the changer…right?...With me so far?
We also want to always consider the fact that the higher on the bellcrank we go, the more force will be required to activate it. So lets place a rod in bellcrank position 2, and in changer hole #2. Place a spacer (if used) and (or) the hex nut in the changer.
We will now set the lever travel to facilitate the pull.
As we tighten the hex, here’s what occurs. The hex will eventually meet the changer, which is spring loaded…as we continue to turn, this rod as it is being shortened, will pull the lever up into position until it reaches its fixed stop. ANY FURTHER TIGHTENING OF THE HEX WILL BEGIN TO PULL THE CHANGER. This is EXACTLY what your issue is, if you tune an open string, then the pull, only to find that the open string is now SHARP…or flat in the case of a lower. Now if you will turn the guitar on its side, and plug in a tuner…we will precisely set the pedal stop..
Once you have removed ALL of the SLACK from this rod, back it off until the E string comes back to where you originally tuned it. At this point even the slightest movement will immediately raise the string in pitch…BUT, this is not what we want. We need to add a little slack, or “play” in the pull, so lets back off the HEX ANOTHER 1.5 full turns. Now we are sure that the changer is not BOUND by this rod, we can pull the lever to its stop, and see where the pitch goes. If its flat…the travel must be increased by backing off the PEDAL STOP SCREW. Of course if it pulls to California, we can shorten it until it pulls precisely to F. The slack that you put in assures us of a several things. If you change the gauge of that string by 1 or 2 thousandths, it still may work properly. This properly tuned stop, and rod, will not impede other pulls or lowers on that string.
Now it only makes sense that if a .014 gauge string is in Bellcrank 2 changer 2, then a pull on string 8 can be put in the EXACT same holes, and it will function BEHIND string 4. Remember, we don’t have to pull 8 as far as we do 4, to get it to F. Now the variables come in…where to place string 8?..Well, we DO use the formula 4-2-2, 8-2-2 for this particular change on the Mullen. The result is a long enough thrown on both strings to accommodate “feeling” in the pull. In other words, if it pulled very short, and immediately, it could actually be too fast…but, if that’s what you desire.. Move string 4 up the bellcrank and shorten the pedal travel as discussed earlier..
Now that we have the E to F thing down, lets talk about ½ stop feels, because this is where they are created. Although you probably wont feel this one on a lever there will be a slight resistance created. Heres how:
Remember after finding the point where the hex pulled the lever to its stop, we backed the hex off 1.5 turns. With string 8s rod in the same bellcrank and changer positions as string 4, heres what will occur. String 8s hex is farther away from changer contact than string 4 is. String 4 will be affected first, then somewhere during its movement, string 8 will begin to pull. Where you reach the larger strings pull/lower is where the resitance is felt as a TIMED HALF STOP. So therefore, if you change the placement in either/and/or, string 8s bellcrank or changer, it will effectively change the activation point, and therefore change to position/tuning of the half stop. You could also effectively change string gauges and ZERO in on a potential stop!! The most widely used one is on string 2, on the RKR. The formula for rodding on the Mullen is 2-5-5, 9-5-5…(String 2 Bellcrank 5, changer 5 etc) It just so happens that this times almost perfectly to string 9s lower, and string 2s "D" note
Although this SOUNDS rather complex, you only have to experiment with an ENTIRE guitar a few times to get the hang of it. As long as your undercarriage is working properly as stated before….you haven’t a thing to worry about..In the end, being able to experiment with timed half stops has resulted in my guitar being more functional than EVER, and I have the confidence to tear down just about anything..and start over!
SPLITS
I have seen countless players that have split capability and are NOT using this function to its maximum potential. I want to help you change all that. Lets look at how the split can turn your guitar into a much more complex to tune beast than it already is..LOL…First thing we need to remember is that once the "SPLIT" is setup, the LOWEST LOWER on that STRING MUST be tuned at the SPLIT SCREW, NOT the HEX. The hex must initially be able to lower the string BELOW the target split, and STOPPED, with the split screw. The remaining slack will tune the combination together. Second, the LEVER travels for the LOWERING SPLITS WILL NEED TO BE INCREASED compared to a standard guitar without them, to keep the changer from binding. Just to clarify: A changer is bound when a tuning hex is in contact with the changer, with the guitar at rest.
We will use string 6 lower from G# to F#, split back up to G with the B pedal, as our example.
The first thing we will need to do is to make sure that we can lower string 6 about 25 cents BELOW F# without binding the changer. Now since string 6 lower is most commonly associated with a string 1 raise, we will generally not run into this unless string 6 pull rod is WAY DOWN THE BELLCRANK TOTEM POLE…If it IS in hole 2 or 3, we may need 4 or 5, assuring us that we get maximum travel on the changer finger downward..Since the pedal stop for this lever was set for a .013 gauge whole-tone pull, we should have PLENTY of room to accommodate this.
After tuning our lever to pull effectively below F#, engage the split screw to STOP THE CHANGER FINGER FROM MOVING IT BELOW F#. From here on out, this RKL Lower on string 6 will ALWAYS need to be tuned at the SPLIT SCREW. We still have some travel on the hex to play with now, and we are going to USE IT!...
Lower string 6 to F#, and then step on the B pedal. Place your tuning wrench on STRING 6’s LOWERING HEX NUT and tune the G NOTE with BOTH THE LEVER AND THE PEDAL ENGAGED…..NOW check your work and settings. If you release the lever and pedal, and string 6 open, has been pulled FLAT….YOU HAVE TO INCREASE THE LEVER TRAVEL UNTIL IT DOESN’T, or MOVE STRING 6' ROD HIGHER ON THE BELLCRANK, and start again. Also, EVERY String that is on that lever will have to have their HEX nuts retuned, as the lever travel changed. Since you are making a travel increase to a fairly long throw already, THIS is where you might want to start splitting hairs…Make it precise. And remember, as long as it doesn’t fall of the bench, or catch on fire, spill Coke in the changer…It isn’t Broken…YOU CAN ALWAYS START OVER!>….I had to…Several times in the beginning..lol..
Lets now look at one that ive setup on countless guitar to a players delight. Lets spilt string 4 with the C pedal…First lets set the travel for the C pedal…The formula for the rodding is 5-2-2, 4-3-3. Rod your guitar and begin with string 4. Turn the HEX nut until string 4 begins to go SHARP. Back off until its in tune, and then back off 1.5 turns from there. Step on pedal C…see where she goes. If its flat the pedal must travel farther….etc…Now do the same with your lowering of string 4 rodded 4-5-5, 8-4-5. When you’ve found the bound changer position, back off 2.5. turns, and set your lever travel to bring your E approximately 25 cents BELOW D#. Now screw in your split screw to stop the changer from lowering precisely at D#, and you’ve got your slack. Step on pedal C, raise E to F#. Now use the 4th string LOWERING HEX to tune the C note split…VOILA!....Once you’ve done this a few times…It’ll be old hat.
Now back to the beginning, and the reason for this long drawn out post.
Your guitar now has functions that give your basic E Major, A major chord forms, MINOR, and MINOR 6 functions..The C pedals/D Lever give you huge Augmented chords…but you must remember which strings have the splits, and adjust them when you tune….remember…TEMP, HUMIDITY, CABINET DROP….etc etc etc….they ALL play a part in the balancing act of tuning a pedal steel guitar.
Ill be happy to add to this post, as Im sure some of you will have valid questions. So, please feel free to post them here..ive got 5 more days off..
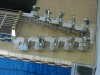
So heres the pictures of the components we talked about..
Pedal Stop Screw Adjustment

Adjustable Lever Travel Stop

Fixed Lever Stop

Split Screw

Lowering Finger Displaced

Split Screw Changer Contact Point


 If you want to have an ongoing discussion, please email me, don't use the Forum messaging which I detest!