| Author |
Topic: Just finished 6 string "Rocket" shape |
Iestyn Lewis
From:
Georgia, USA
|
 Posted 20 Sep 2012 12:05 pm
 |
|
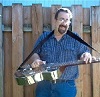
Here's a custom order I just finished for a local buyer. Dark oil finish, aluminum fretboard with cut fret lines. Hard to give this one up!


_________________
Iestyn
http://facebook.com/trcguitars |
|
|
|
Larry Phleger
From:
DuBois, PA
|
Posted 20 Sep 2012 12:08 pm
|
|
| Nice job. What pickup are you using on it? |
|
|
|
Iestyn Lewis
From:
Georgia, USA
|
|
|
|
Steve Cunningham
From:
Atlanta, GA
|
|
|
|
Iestyn Lewis
From:
Georgia, USA
|
Posted 21 Sep 2012 7:43 am
|
|
Hi Steve, yes I did! I sent him home with a couple of C6 tabs. I asked him to let me know if you thought it needed any adjustments for whatever gauges/tuning you're planning on setting him up with. I'll be getting in touch with you to get some lessons myself.
_________________
Iestyn
http://facebook.com/trcguitars |
|
|
|
Andy Henriksen
From:
Michigan, USA
|
Posted 21 Sep 2012 8:15 am
|
|
| Very nice! Did you buy or make the fretboard? If the former, where'd you get if from? If the latter, can you give me a brief explanation of the process? |
|
|
|
Iestyn Lewis
From:
Georgia, USA
|
Posted 21 Sep 2012 8:47 am
|
|
Hi Andy - I made the fretboard. Process was:
Order a 2.5 inch wide x 18 inch long x 1/8 inch thick piece of 6061 aluminum from metalsupermarkets.com.
Clean the grease off with paint thinner. Sand it down to 400 grit or so.
Use self-etching primer (auto parts store) followed by flat black to paint the front and sides.
Using a printed fret template from
http://www.ekips.org/tools/guitar/fretfind2d/, saw lines about 1/2 way into the metal to expose bare metal. I used my bandsaw and a jig, you could do the same with a handsaw and miterbox or similar jig.
For the dot markers, I used a Dremel bit with a flat bottom I found at Home Depot, chucked into my drill press. I found a regular drill bit wandered too much. 2 of the dots are countersunk holes for the mounting screws.
I sanded off the edges to get the bare metal back on the sides as well.
That's about it! It took a bit of trial and error, but the result is much more professional looking than printouts and decals.
_________________
Iestyn
http://facebook.com/trcguitars
Last edited by Iestyn Lewis on 21 Sep 2012 9:25 am; edited 1 time in total |
|
|
|
Andy Henriksen
From:
Michigan, USA
|
Posted 21 Sep 2012 9:05 am
|
|
That's awesome! If I ever settle my mind between making and buying, and go for ther making option, I might have to steal your technique!  |
|
|
|
Randy Reeves
From:
LaCrosse, Wisconsin, USA
|
Posted 22 Sep 2012 7:22 am
|
|
| the bridge looks fantastic. I can see that the nut is hand made, is the bridge purchased or hand made? |
|
|
|
Dom Franco
From:
Beaverton, OR, 97007
|
|
|
|
Iestyn Lewis
From:
Georgia, USA
|
Posted 24 Sep 2012 4:28 am
|
|
Randy - the bridge is a commercial unit from GuitarFetish.com. For 6 string guitars there are so many good inexpensive commercial parts available it just makes sense.
Dom - an even layer of wood glue and clamping overnight for lamination. I use an old putty knife to spread the glue out into an even thin layer.
_________________
Iestyn
http://facebook.com/trcguitars |
|
|
|
Dom Franco
From:
Beaverton, OR, 97007
|
Posted 24 Sep 2012 5:27 am
|
|
I always use two 3/4" pieces of hardwood in a similar arrangement, but I have never glued them together. I just might try it this time, though.
Of course that means routing from the top, and using hardware or some sort of pickguard/control plates to cover the spaces. Hmmmm.... 
_________________
https://www.youtube.com/channel/UCYG9cvwCPKuXpGofziPNieA/feed?activity_view=3 |
|
|
|
Peter Jacobs
From:
Northern Virginia
|
Posted 24 Sep 2012 8:02 am
|
|
Dom -- instead of routing after you've glued the laminations, you could cut/rout your holes in the top layer first, then glue them up. Might take a little more precision in the alignment, but could make it easier to drill and/or rout.
_________________
Peter
---------
www.splinterville.com
YouTube: https://www.youtube.com/@splinterville6278/videos |
|
|
|
Don Barnhardt
From:
North Carolina, USA
|
Posted 28 Sep 2012 7:29 pm
|
|
| It's a little hard to describe but i built a laminating press with shop scraps and a couple cheap hydraulic jacks. If anyone is interested I'll try to post a pic. |
|
|
|